Here is the complete markdown-formatted listicle article:
If you spend more than two minutes hunting for the right screwdriver before starting a project, your tool storage system isn’t working for you. A disorganized toolbox wastes time, creates frustration, and even costs money when tools go missing or get damaged. The good news? You don’t need a massive budget or a custom workshop to fix this. With a few smart storage moves — some as cheap as a few dollars — you can set up a system where every tool has a home and you always know exactly where it is.
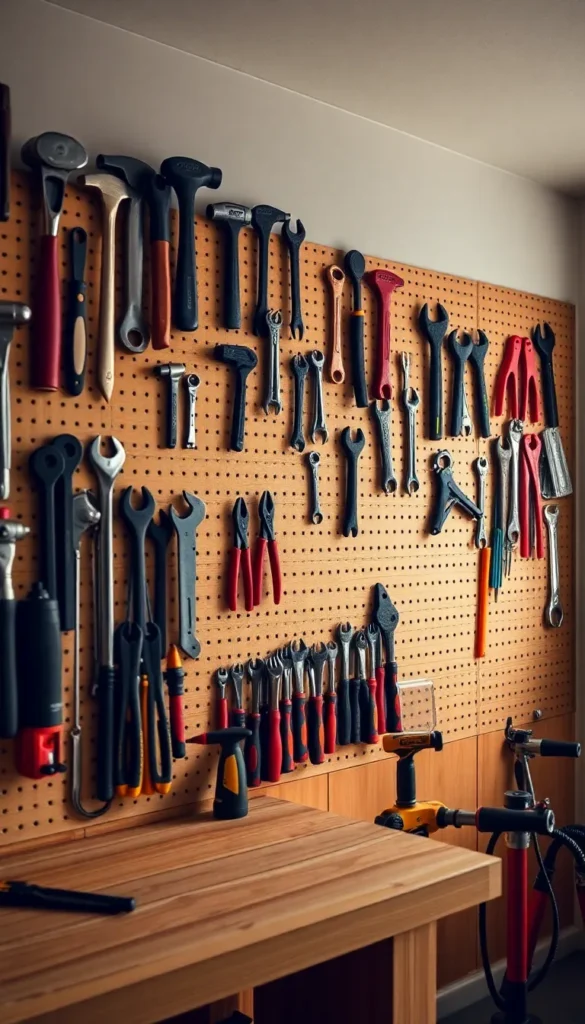
1. Mount a Pegboard on Your Garage Wall

Pegboard is the ultimate tool wall. It costs around $20–$40 for a 4×4 sheet at a hardware store. Paint it first, then mount it using spacers so hooks fit behind it. Arrange tools by category — cutting tools together, measuring tools together. You can rearrange hooks anytime. Outline each tool with a marker so you always know what’s missing. It’s a simple system that works for a single shelf or an entire wall.
2. Use a Magnetic Tool Strip for Small Metal Tools
A magnetic wall strip — the kind sold for kitchen knives — works perfectly for small metal tools. Screwdrivers, hex keys, chisels, and small wrenches snap right on. Mount it under a cabinet or on an open wall. Strips run from $10 to $25. Place it at eye level so tools are visible at a glance. No hooks, no drawers to dig through. This is one of the fastest and cheapest upgrades you can make to any workspace.
3. Label Every Drawer and Bin
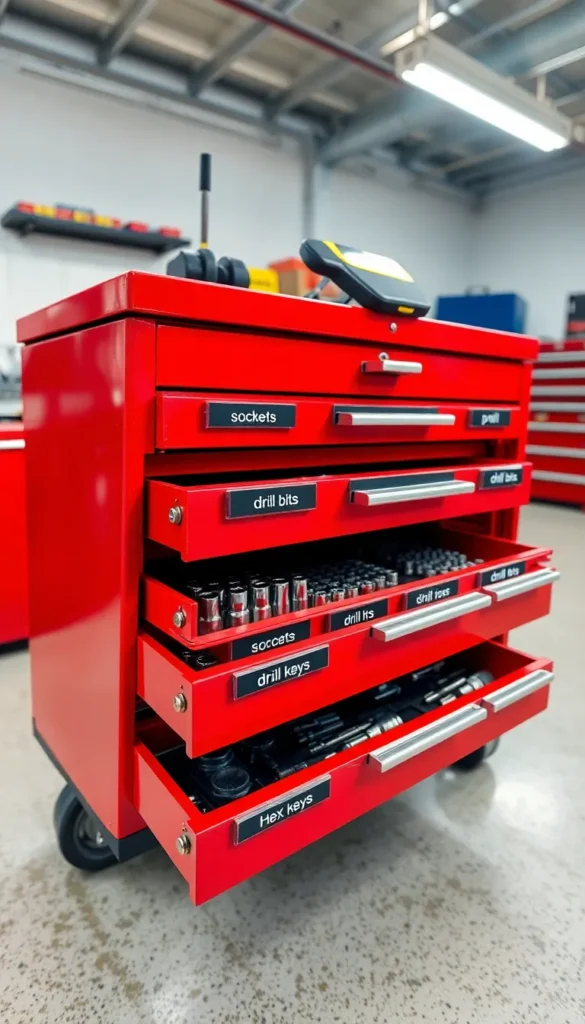
You already know what’s in every drawer — until someone else uses the shop, or you forget after a busy week. Labels remove all guesswork. Use a $15 label maker, or just write on masking tape. Mark each drawer, bin, shelf, and jar. Include size ranges where helpful — “Sockets 10–19mm,” “Screws #6–#10.” This tiny habit cuts search time dramatically. Once labeled, it’s also much easier to put things back correctly after each use.
4. Sort Screws and Hardware into a Tackle Box
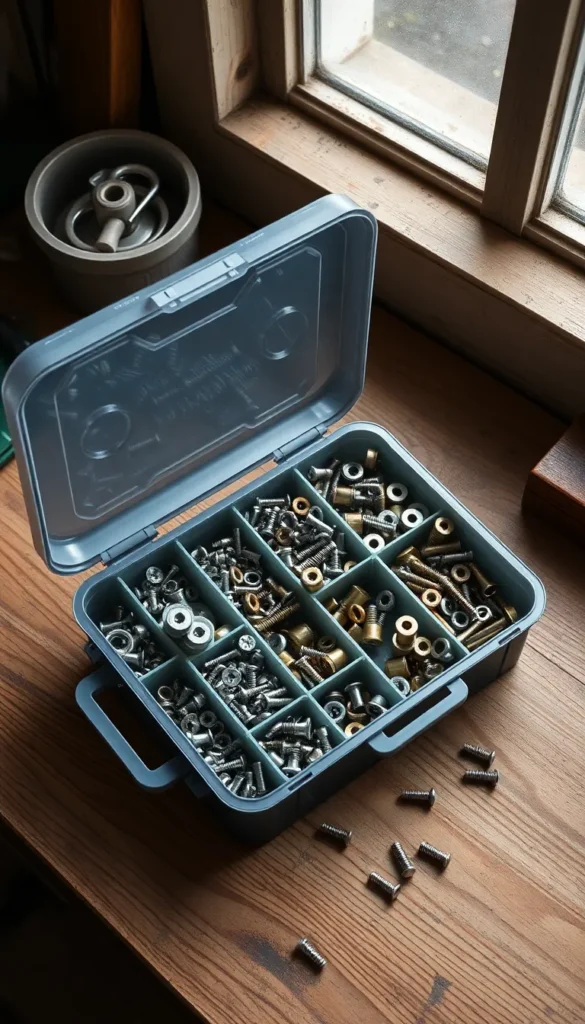
A fishing tackle box from a dollar store or sporting goods shop makes a perfect small hardware organizer. Compartments are adjustable, the lid snaps shut, and you can carry the whole thing to your work area. Sort by type first — screws, bolts, nuts, washers — then by size within each section. Label the compartments with a marker directly on the lid. A good tackle box costs $5–$15 and holds hundreds of small parts without any mess.
5. Build a Simple Wall-Mounted Lumber Rack

Leaning lumber against a wall creates a safety hazard and makes boards hard to sort. A wall-mounted horizontal rack solves both problems. Use 2×4 scraps cut to 16 inches, mount them on a flat wall at two heights, and stack boards flat across the arms. Total material cost: under $15. This keeps boards off the floor, lets you see lengths at a glance, and frees up significant floor space for other things.
6. Hang Power Tools on French Cleats
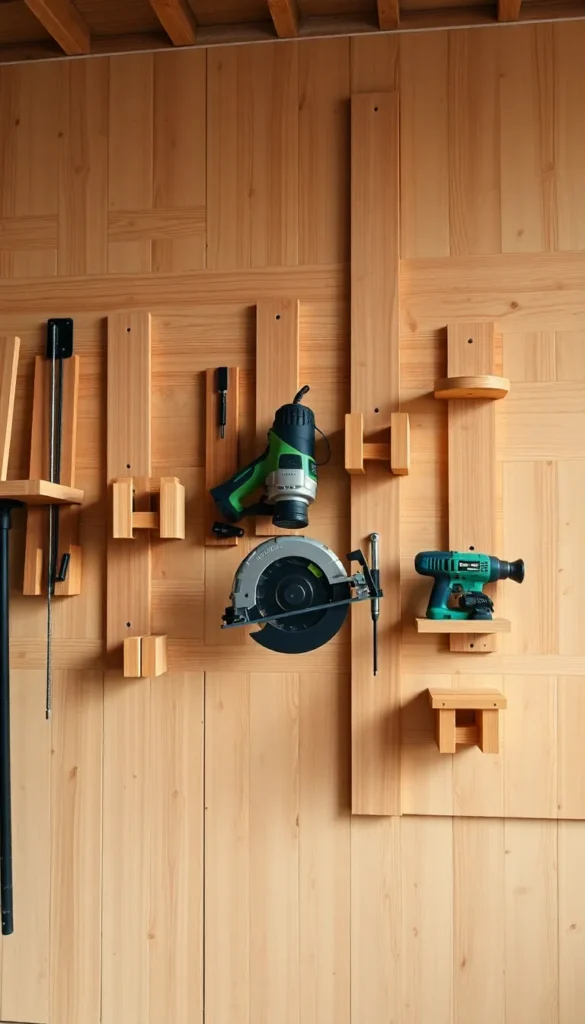
French cleats are one of the smartest workshop storage systems you can build. Cut a 45-degree bevel along the length of plywood strips. Mount one strip on the wall and attach the matching angle to any holder or bracket. Your tools hang securely and you can rearrange everything in seconds. Build a full wall system for under $50 in plywood. You can make custom holders for each power tool so nothing shifts or tips.
7. Use PVC Pipe as a Cord Organizer
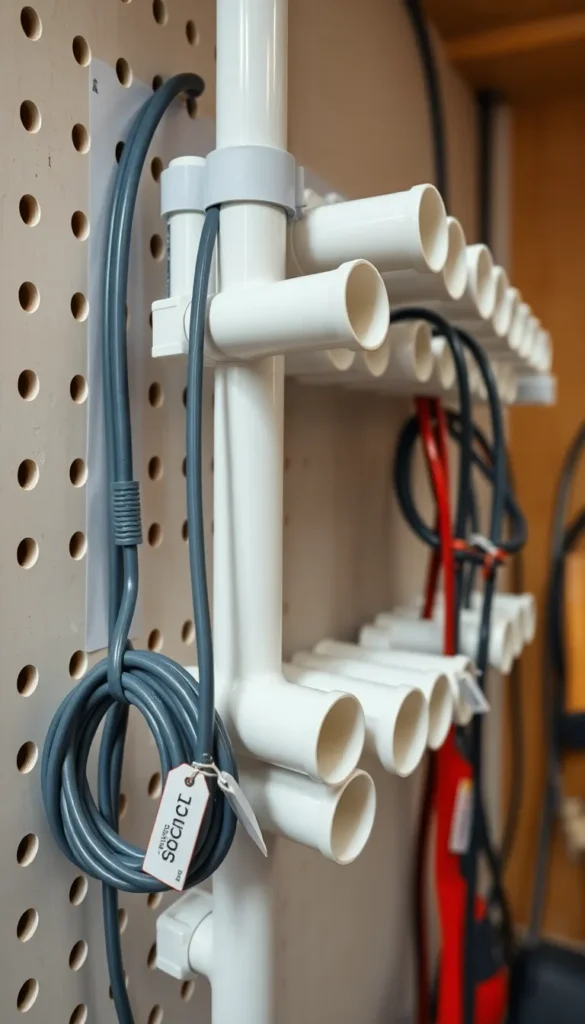
Power cord clutter is a real time waster. Cut short lengths of 3-inch PVC pipe and mount them on your pegboard or wall. Coil each cord and slide it into its own tube. Label the end of the cord with tape so you can grab the right one without pulling everything out. PVC pipe costs almost nothing at the hardware store — often under $3 for what you need. It’s a clean, fast solution that also protects cord ends from damage.
8. Install Drawer Dividers in Your Toolbox
Most toolbox drawers are just empty trays where everything slides around. Cut foam inserts to fit your drawers and trace tool outlines into the foam using a utility knife. Tools stay in place, nothing rattles, and a missing tool is immediately obvious. Use any firm foam — packing foam works well. For a budget move, use non-slip drawer liner material instead. Either option costs under $10 and makes a big difference in how fast you can find things.
9. Dedicate a Bin Just for Extension Cords
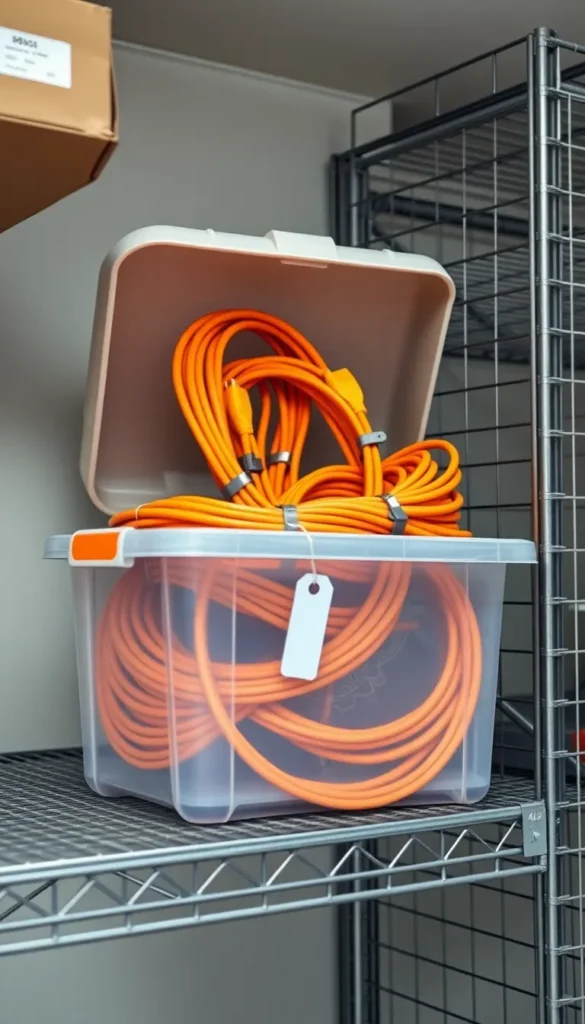
Extension cords deserve their own storage spot. When they share space with other tools, they tangle with everything. Use a large plastic bin or milk crate — something open-top so you can drop cords in easily. Coil each cord using the over-under method to prevent kinks, then secure with a velcro strap. Label each cord with its length. A dedicated bin keeps them ready to grab in seconds and off the floor where they become trip hazards.
10. Create a Charging Station for Cordless Tools
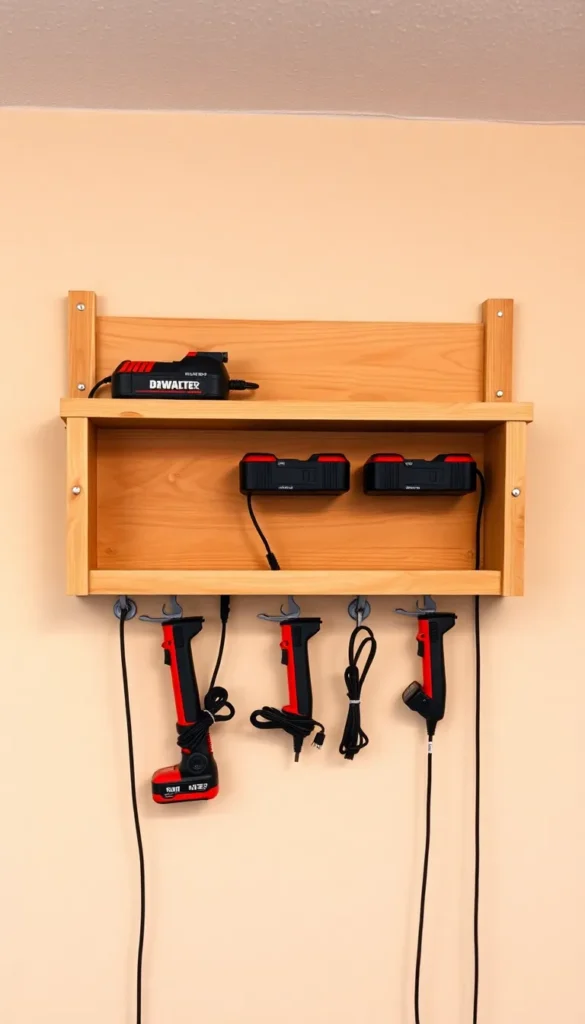
Cordless tools are useless with dead batteries. Set up a wall-mounted charging shelf so batteries stay plugged in when not in use. A small shelf with a power strip screwed underneath keeps everything tidy. Hang the tool bodies on hooks below the shelf so they’re always paired with their battery. This setup costs around $20–$30 total. You’ll never reach for a dead drill again.
11. Use a Canvas Apron as a Portable Tool Holder
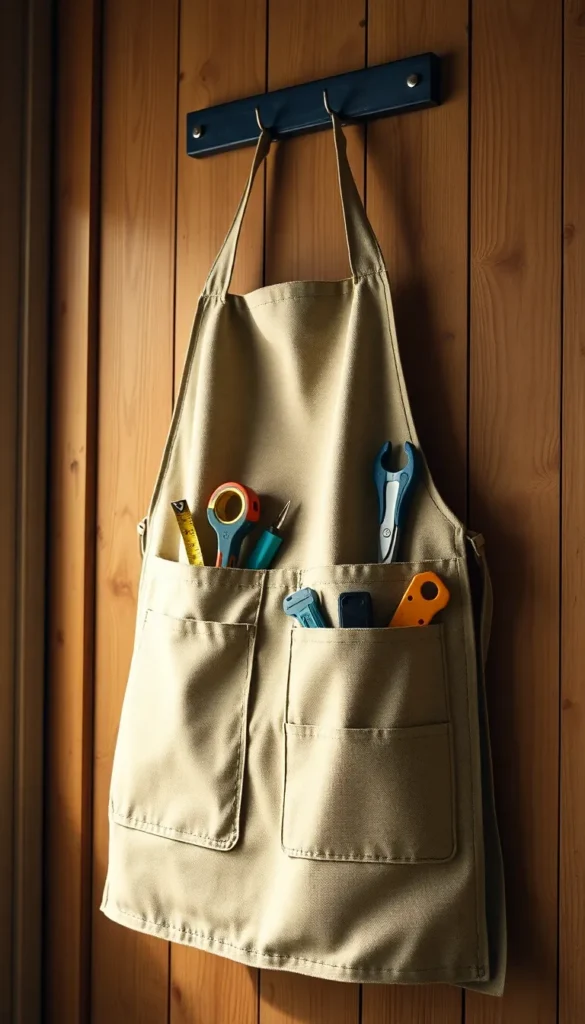
A canvas apron with pockets gives you a portable workshop. Fill it with your most-used daily tools — tape measure, pencil, utility knife, and a couple of screwdrivers. When you start a job, put it on. When you’re done, hang it up still loaded. Nothing gets unpacked and repacked. A good canvas apron runs $10–$25. It’s especially useful for people who move between rooms or job sites and need their basics always within reach.
12. Store Drill Bits in a Labeled Index Card Box
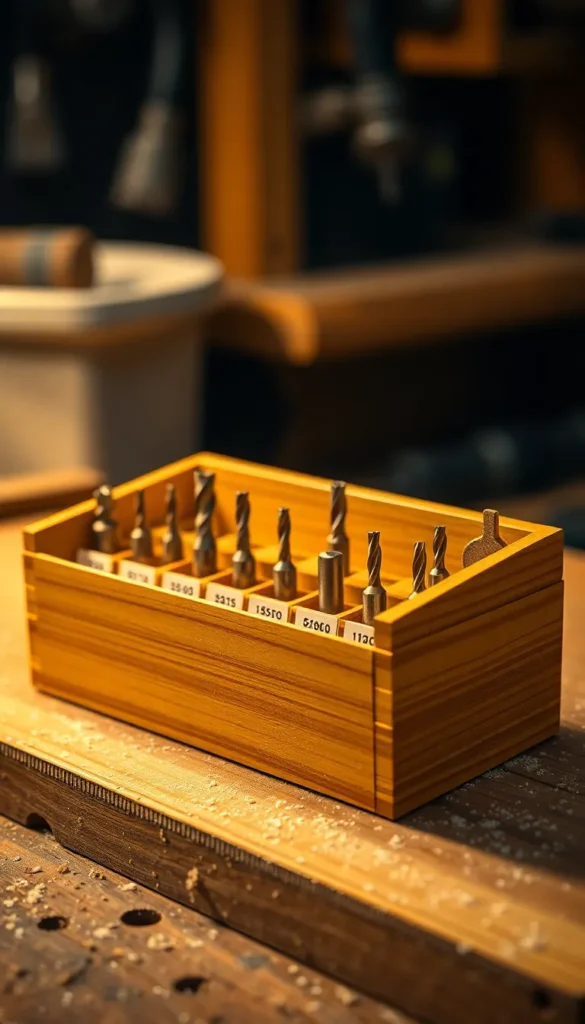
Drill bits are tiny and easy to lose. A small index card or recipe box with divider tabs makes a surprisingly effective bit organizer. Label each section by size — 1/16, 1/8, 3/16, and so on. Drop bits point-down into each slot. The box fits in a drawer, costs almost nothing, and keeps every bit visible and sorted. If you want something more durable, metal index boxes at office supply stores work even better and last for years.
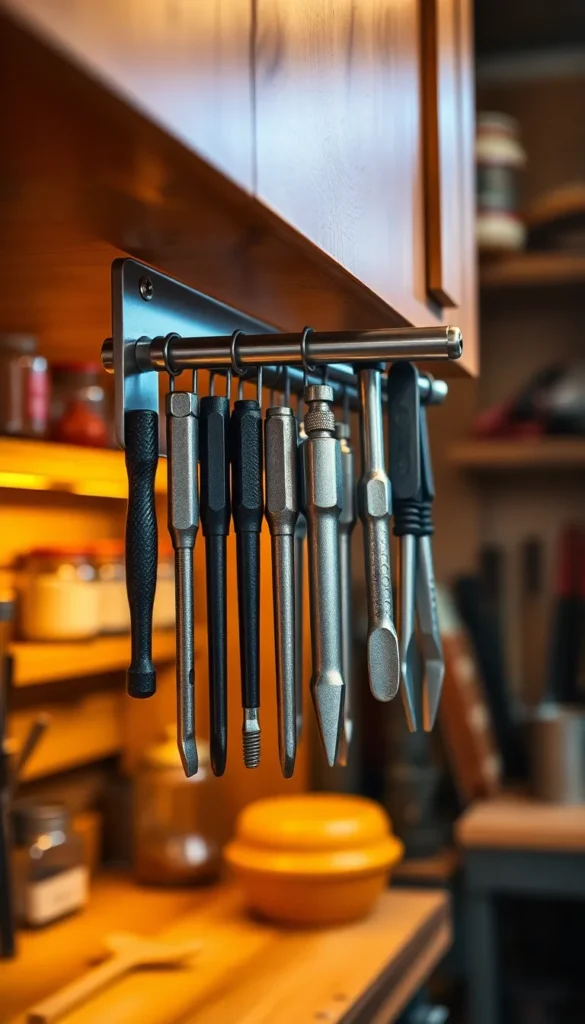
13. Mount a Tool Rail System Along a Workbench
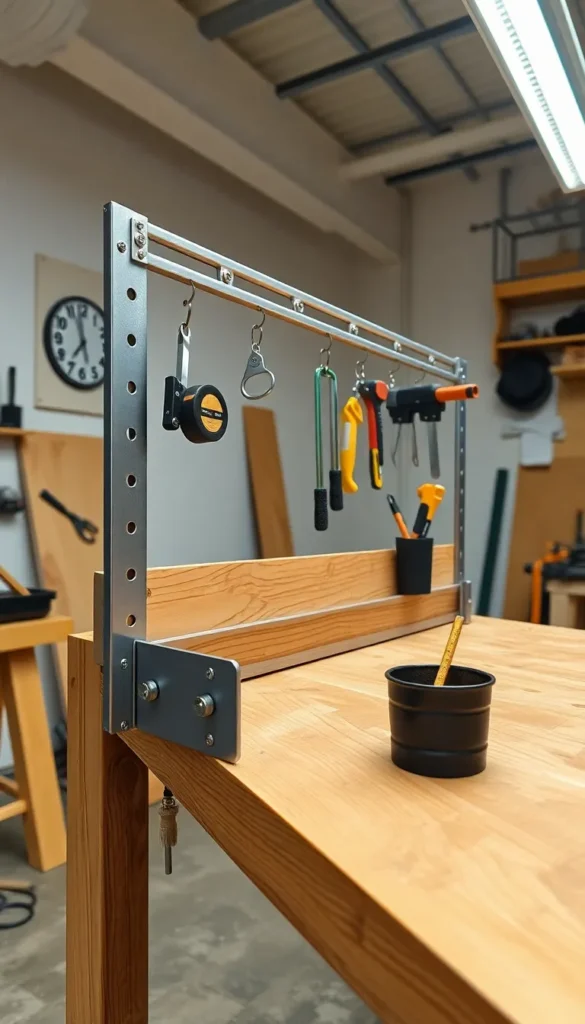
A wall rail system — like the kind used in kitchens for utensils — works perfectly above a workbench. Mount a metal rail at the back edge of the bench wall, then hang hooks, small bins, and holders for your most-reached-for tools. This keeps the bench surface clear while keeping tools within arm’s reach. Starter rail kits run $15–$30 at hardware stores. You can also improvise with a wooden dowel and DIY hooks made from bent wire.
14. Turn a Shoe Organizer into a Tool Holder
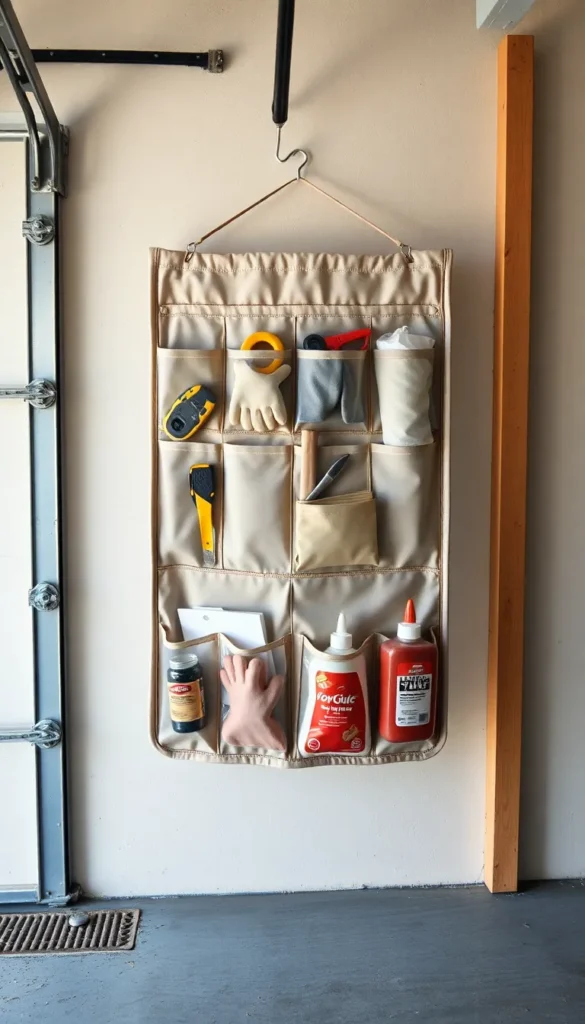
An over-the-door shoe organizer has clear pockets the perfect size for small tools and supplies. Hang one on the back of a garage door, workshop door, or any free wall space. Pockets fit tape measures, utility knives, sandpaper packs, gloves, and dozens of small items. It costs $10–$20 and makes use of dead vertical space. This works especially well in small garages where wall and floor space are limited.
15. Use Stackable Bins for Seasonal Tool Sorting
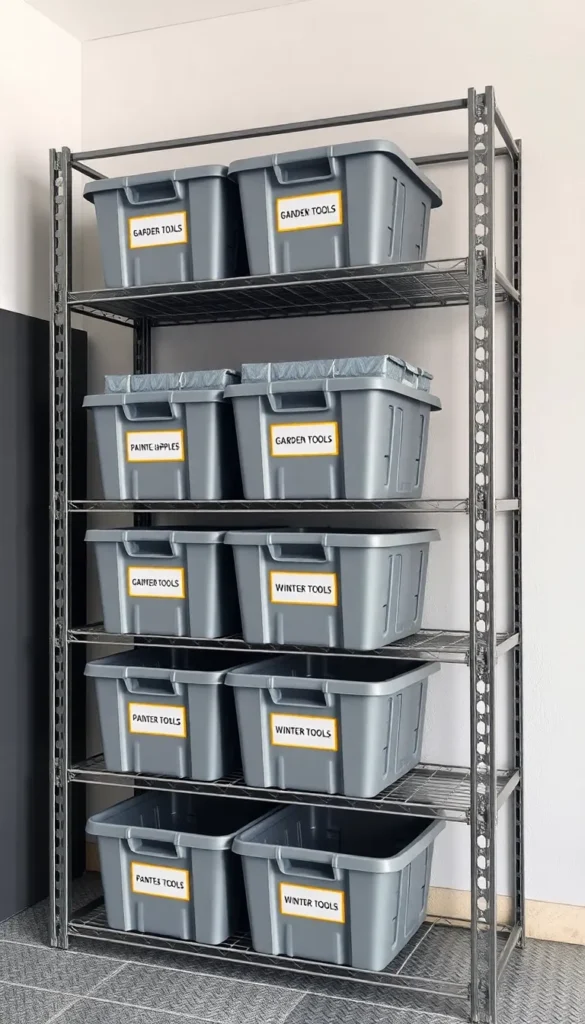
Not every tool needs daily access. Seasonal or project-specific tools — garden gear, painting supplies, holiday light hangers — can live in stackable bins on upper shelves. Use matching bins for a clean look and label the front of each one clearly. Pull the bin you need, use what’s in it, put it back. This approach keeps frequently used tools at eye level and everything else out of the way without being lost.
16. Build a Simple Rolling Tool Cart from a Kitchen Cart
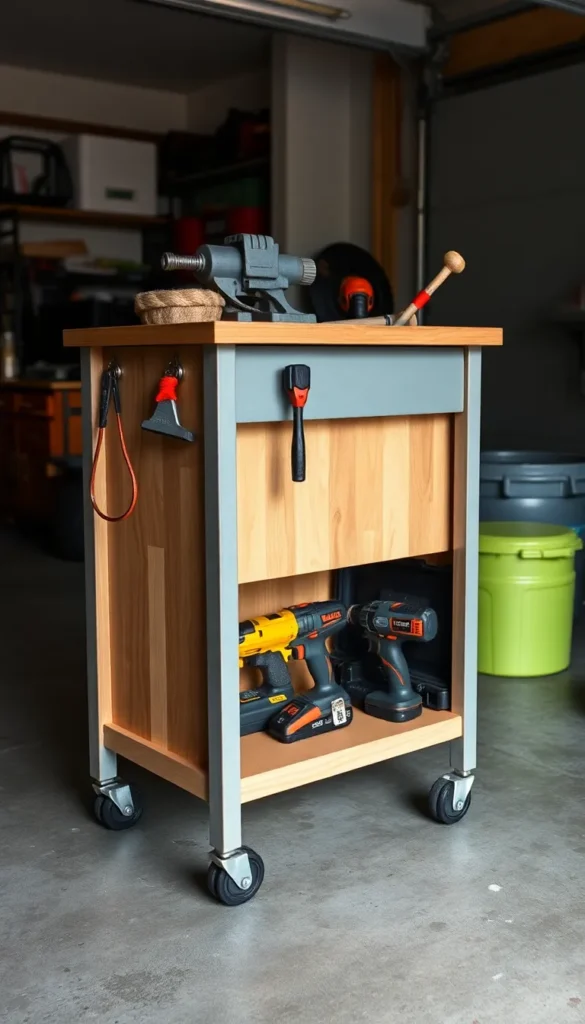
A rolling kitchen cart from a thrift store or discount retailer can become a rolling tool station for under $40. The top surface works as an extra workbench. Hooks on the sides hold frequently used hand tools. The bottom shelf carries heavier power tool cases. Roll it to wherever you’re working and roll it back when done. It’s a flexible setup that works well in shared spaces like garages where layout changes based on the project.
17. Create a Clamp Rack from Scrap Dowels
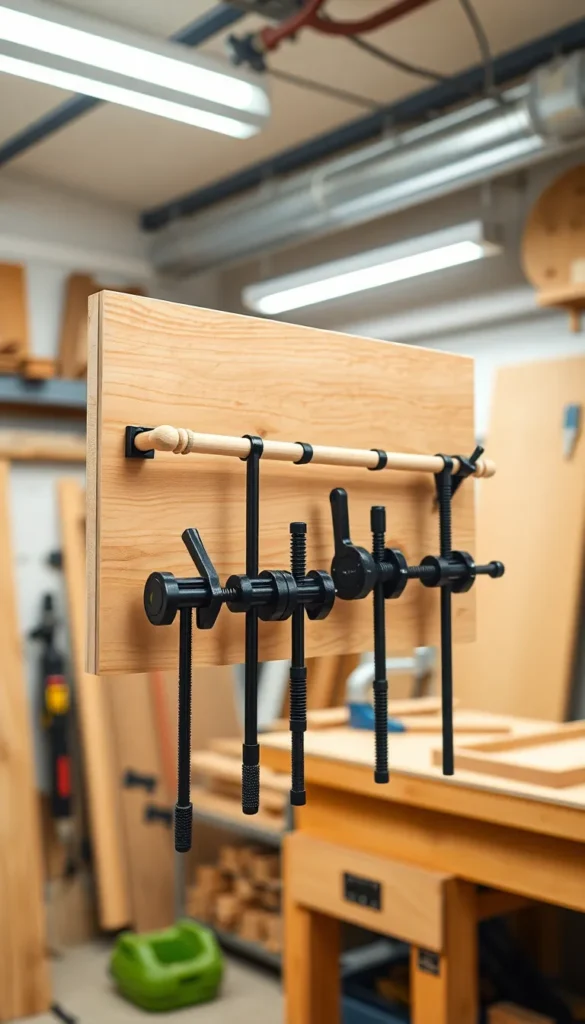
Clamps are bulky and awkward to store. A simple dowel rack solves this quickly. Mount a plywood panel on the wall and drill holes for 1-inch dowels spaced every 6 inches. Hang bar clamps over the dowels, nest C-clamps onto shorter dowels, and clip spring clamps to a wire along the bottom edge. Total cost: under $15 in wood scraps and dowels. Clamps become easy to count, grab, and return — no more piles on the floor or workbench.
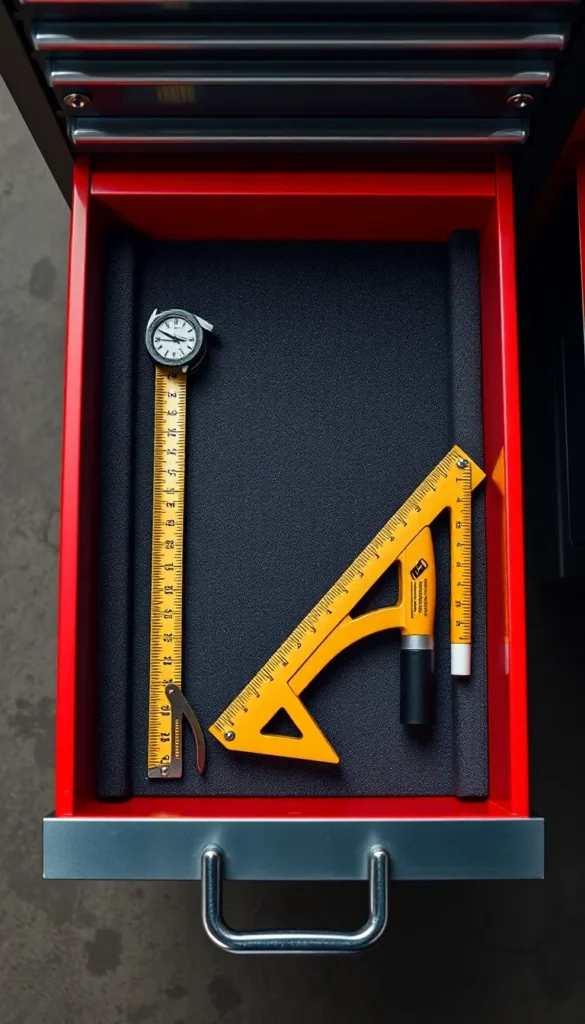
18. Set Up a Dedicated Measuring Tools Zone

Measuring tools deserve their own spot because they’re used at the start of almost every project. Group your tape measures, levels, squares, and marking gauges together on one section of pegboard or a small shelf. Keep them at eye level near the front of your workspace. When everything lives together, you never have to dig across the shop before making a single cut. This small grouping habit pays off on every project.
19. Use Clear Jars for Nails and Fasteners

Here’s a classic zero-waste hack: screw jar lids to the underside of a shelf, then twist the jars on. Nails, screws, staples, and other fasteners are clearly visible, sorted, and stored off the workbench completely. It uses space that’s normally wasted. Mason jars are cheap or free. Label the lids with a marker before mounting. This trick is especially useful in small garages where shelf space is limited but under-shelf space is plentiful.
20. Add a Lockable Cabinet for Hazardous Materials
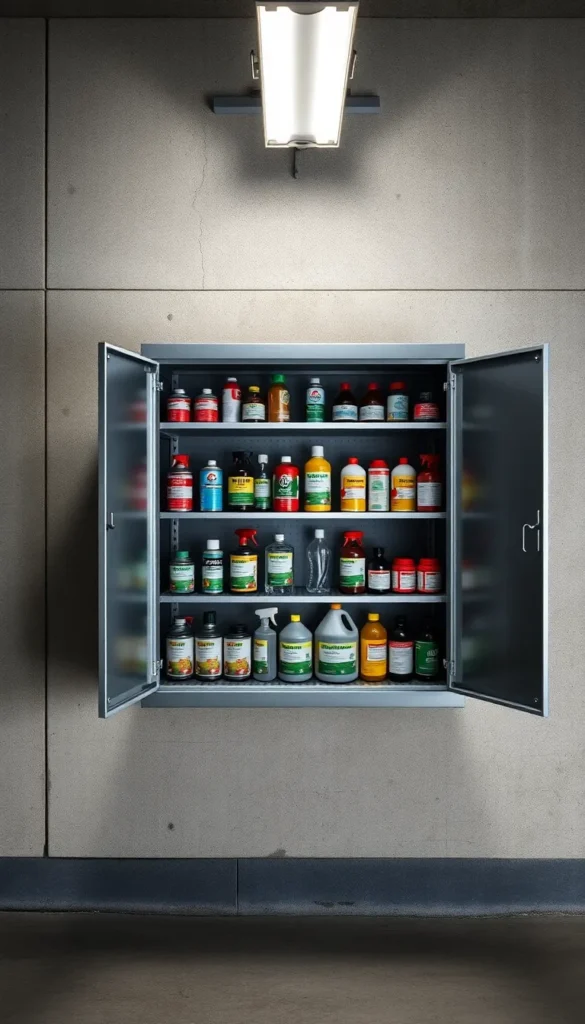
Safety is part of good organization. Paints, solvents, adhesives, and aerosols need to be stored safely — especially in homes with kids or pets. A small lockable metal cabinet keeps hazardous materials contained, reduces fire risk, and keeps curious hands out. Many hardware stores carry basic versions for $40–$80. You don’t need an expensive model. Even a simple cabinet with a padlock works. This is one storage investment that’s about more than just tidiness.
21. Store Hand Saws Vertically in a Slot Rack
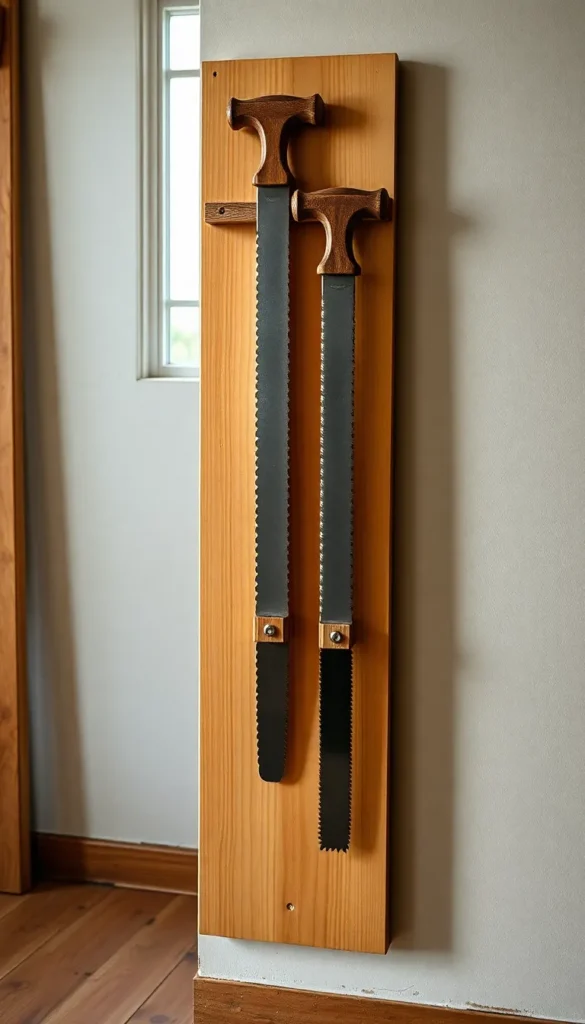
Hand saws stored flat get knocked around and blade teeth get damaged. A slot rack cut from a thick scrap of wood holds saws vertically and protects the teeth. Cut slots slightly wider than each blade at regular intervals. Mount the rack at waist height for easy access. This takes about 20 minutes to build and costs nothing if you have scrap wood. Each saw stands ready without touching others, and blades stay sharp much longer.
22. Organize Wire and Cable with Velcro Ties and Hooks
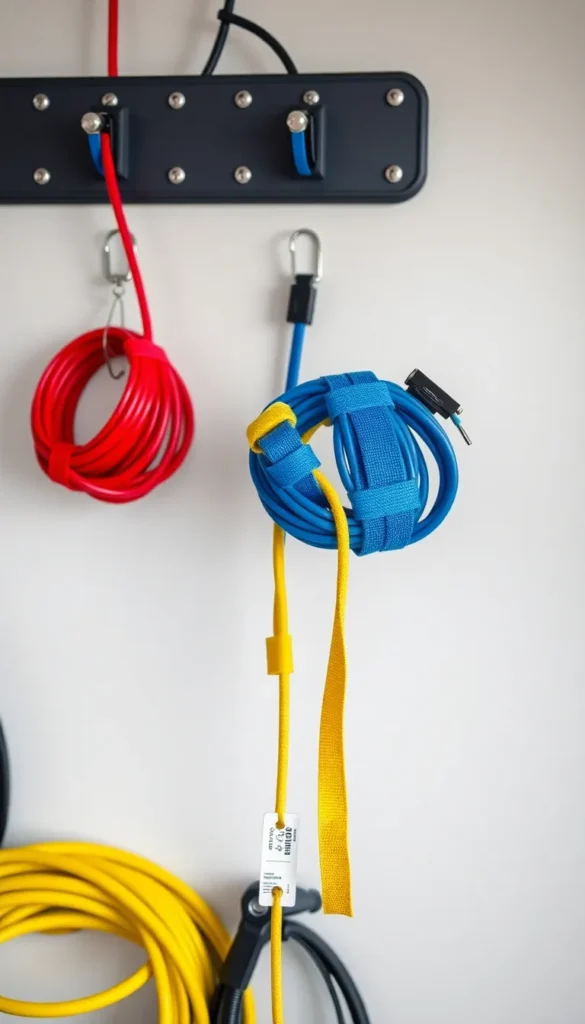
Tangled cables slow you down every single time. Velcro cable ties (not zip ties — those cut the insulation) are the right tool here. Coil each wire, tie it, and hang it on its own hook. Label each one at the end where you’ll see it hanging. A pack of 100 velcro ties costs about $6 online. This takes 15 minutes to set up and saves time every time you reach for a cable. Add a dedicated section of pegboard just for wires and cables.
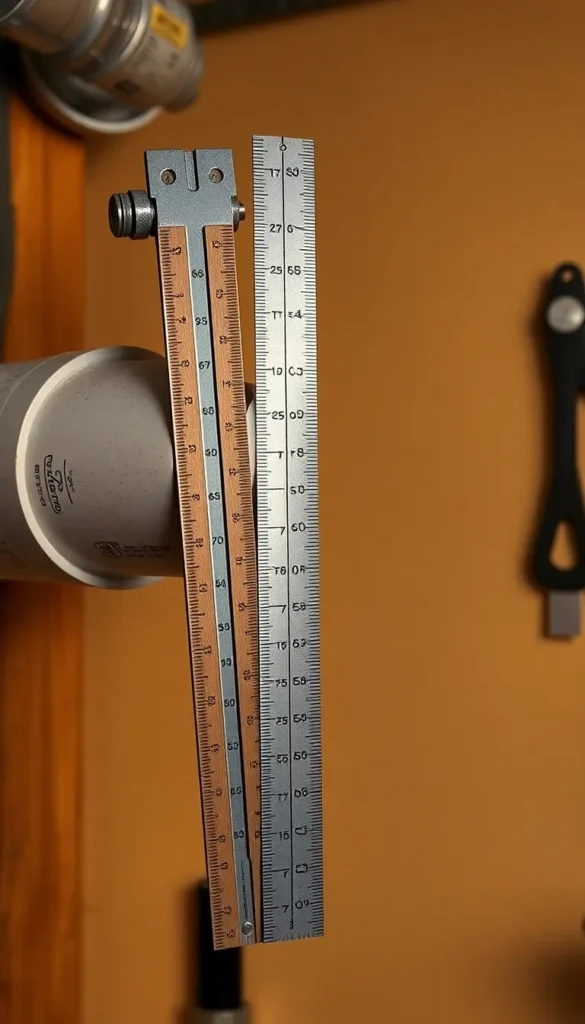
23. Store Levels Horizontally on Two-Point Wall Brackets
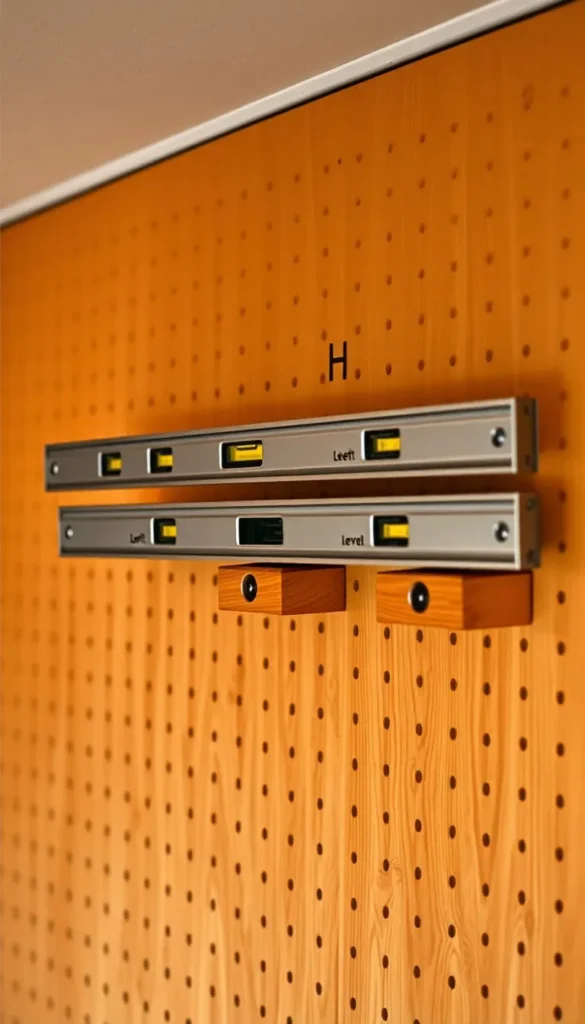
Levels seem minor until you need one and can’t find it — or grab one that’s been bent by falling. Two small wooden brackets screwed into the wall at the right spacing will cradle a level horizontally with zero risk of warping. Mount your 2-foot and 4-foot levels on the same set of brackets side by side. Keep them near your measuring tools zone. It takes five minutes to build and the level stays perfectly flat and immediately visible.
24. Use a Rolling Trash Can as a Sandpaper Station
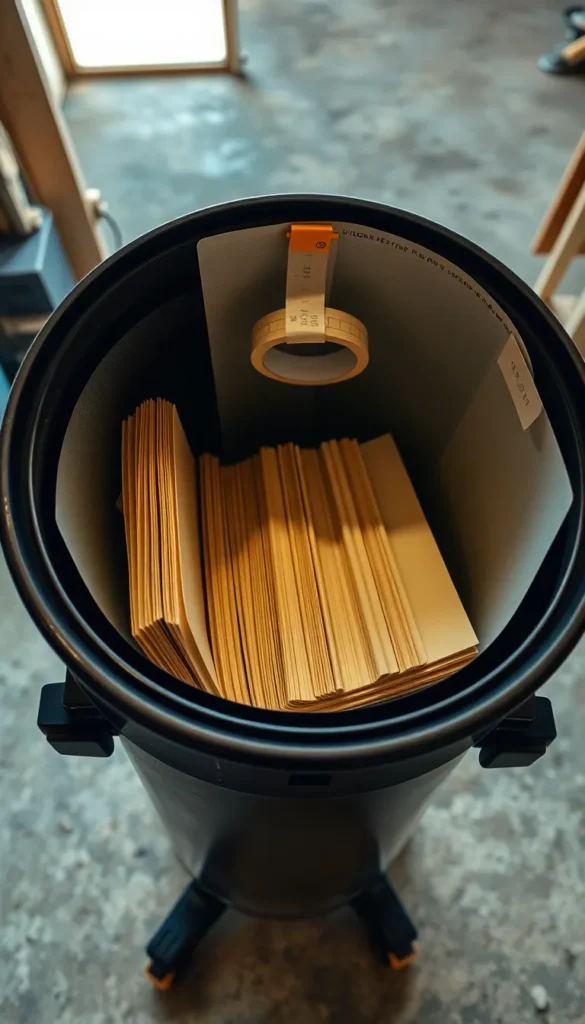
A large rolling trash can makes an unexpected but effective sandpaper organizer. Sort sheets by grit into labeled hanging file folders inside the can. Add a few clips on the rim for tape, markers, and tack cloths. Roll it next to your sanding station when you’re working and tuck it away when done. This keeps sandpaper from getting crinkled or covered in sawdust — a common frustration when sheets are left loose on shelves.
25. Mount a First Aid Kit Next to Your Tool Wall

Organization includes safety supplies. Mount a first aid kit directly on your tool wall — not in the house, not in a drawer, but right at the point of use. When you need it, you’ll know exactly where it is. Stock it with bandages, antiseptic wipes, and medical tape at minimum. Basic kits run $10–$20. Knowing where it is before you need it is part of a well-run workspace, not an afterthought.
26. Make a T-Square Holder from a PVC Pipe Bracket
T-squares and large straight edges are awkward to store. A short section of 4-inch PVC pipe mounted vertically on the wall works as a perfect slot. Drop the T-square in point-first, handle up. It stays protected, takes up almost no wall space, and is visible at a glance. Mount two pipes side by side for a full set of straight edges. Total cost: a few dollars in PVC. It looks purposeful and keeps these tools away from where they’d otherwise lean and fall.
27. Set Up a Tool Return Tray for In-Progress Projects
The messiest point of any tool system is mid-project, when tools come off the wall and get scattered across the bench. Fix this with a dedicated “in use” tray — a wooden box or low-sided bin that sits right on the workbench. Any tool you’re actively using goes in the tray, not randomly on the surface. When the project ends, put everything back from the tray. This one habit closes the gap between a system that works in theory and one that stays organized in real life.
Conclusion
A well-organized tool collection isn’t about perfection — it’s about knowing where things are so you can actually get to work. Start with one area: maybe a pegboard, maybe sorted jars for fasteners, maybe a labeled set of bins. Pick the idea that fixes your biggest daily frustration and put it in place this week. Each improvement builds on the last. Over time, you’ll spend less time searching and more time building, fixing, and creating. The tools are the same. The difference is the system around them.