Your garage has a hidden potential most people never tap into. Whether yours is a dumping ground for holiday decorations, sports gear, and forgotten tools — or just perpetually messy — the right storage approach changes everything. Smart garage organization isn’t about spending thousands. It’s about using vertical space, underused corners, and affordable hardware to carve out real, functional room. This guide walks you through 27 practical solutions, each one actionable, budget-friendly, and designed to help you reclaim your garage starting today.
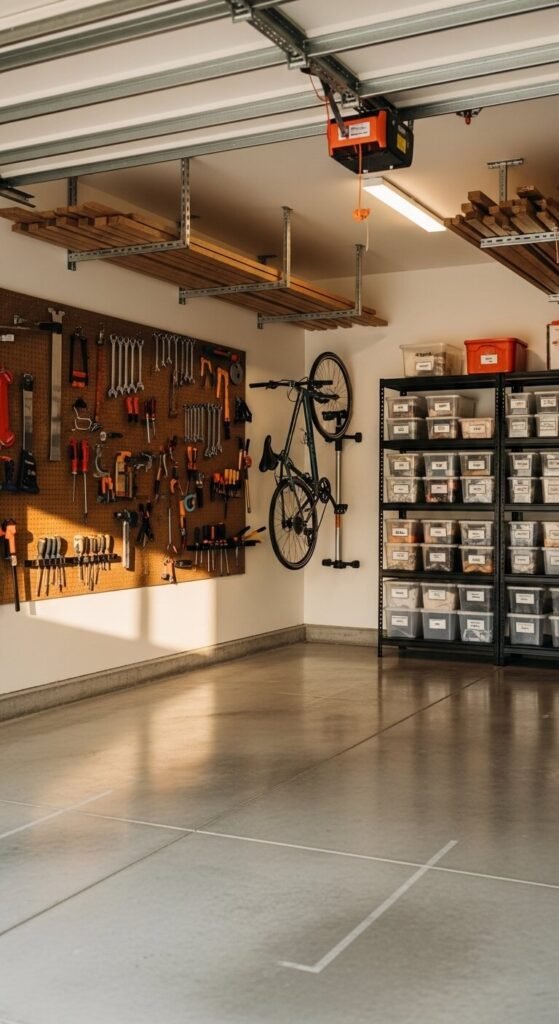
1. Install a Pegboard Wall for Tool Storage
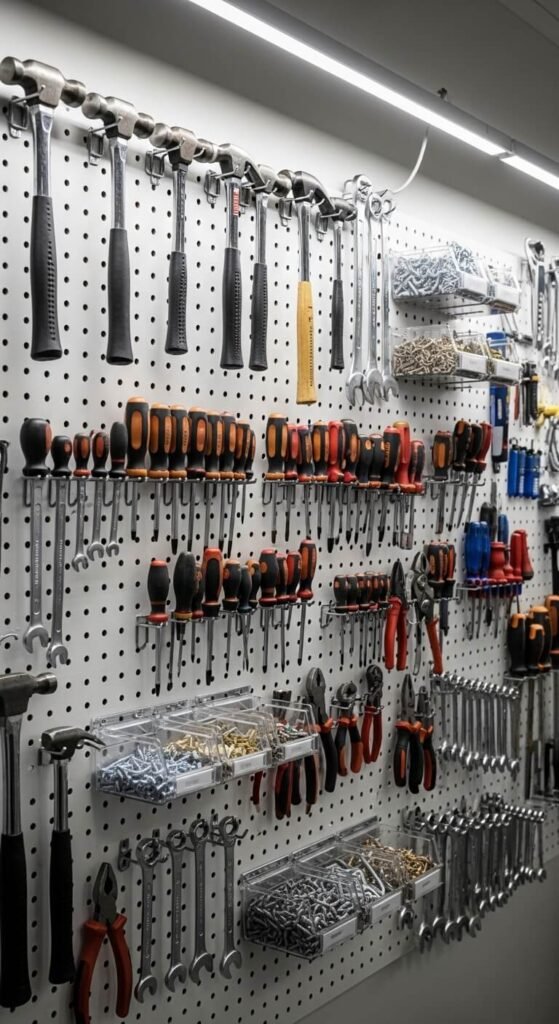
Pegboard is one of the cheapest and most effective garage upgrades you can make. A 4×8 sheet costs around $30 at any hardware store. Mount it directly to wall studs. Then add metal hooks and bins to hold tools, extension cords, and small hardware. Everything stays visible and within reach. No more digging through drawers. Rearranging is simple — just pull a hook and move it. Paint the board white or gray to brighten the space.
2. Use Overhead Ceiling Racks for Bulky Items
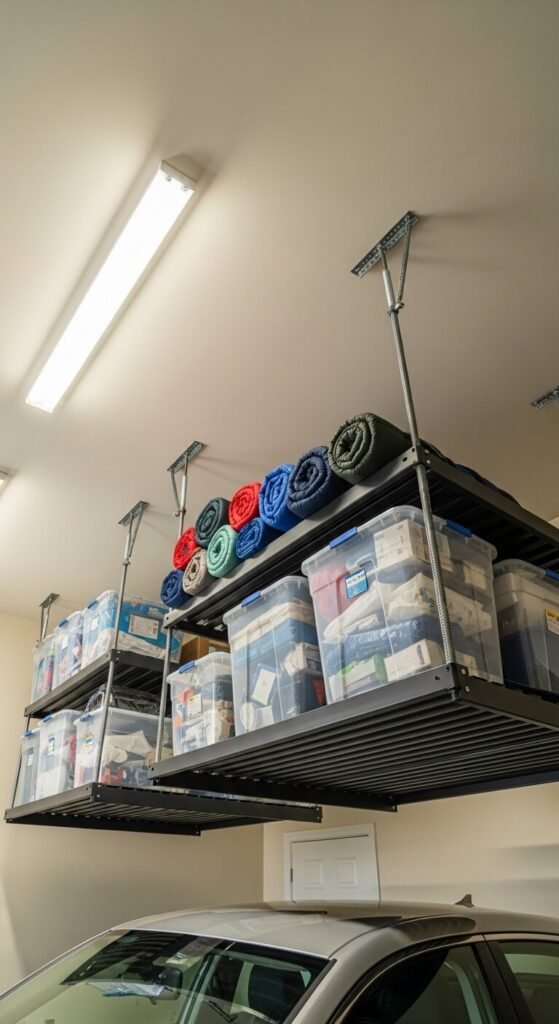
The ceiling is the most wasted space in any garage. Overhead storage racks hang from joists and can hold 400–600 lbs. They’re ideal for seasonal bins, camping gear, and luggage. Kits start around $100 and take an afternoon to install. Make sure bins are labeled clearly — you’ll be stacking them out of direct sight. Use clear containers so you can identify contents without pulling everything down. This one upgrade alone can free up an entire wall.
3. Mount a Bike Hook System on the Wall
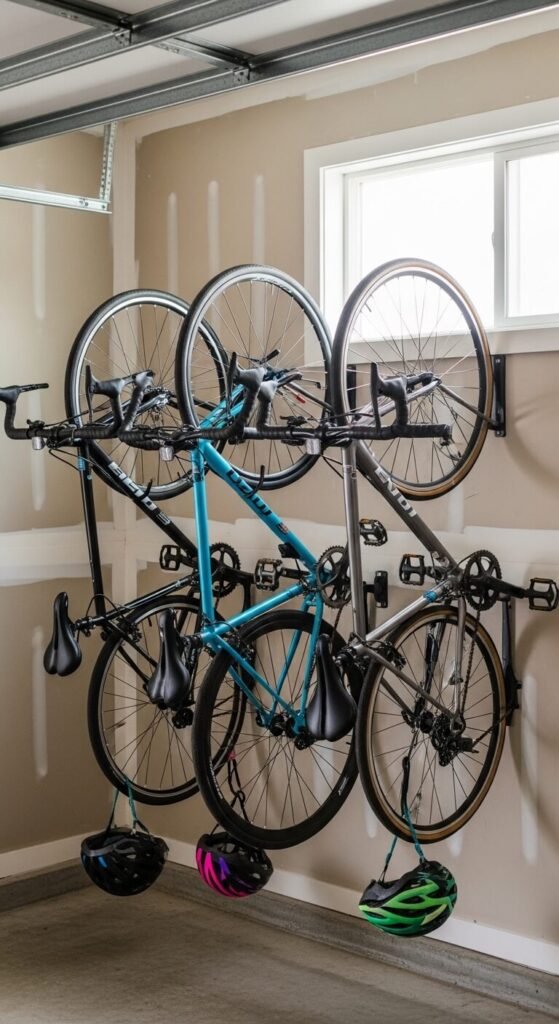
Bikes eat floor space fast. A simple vertical wall hook costs $15–25 per bike and takes 10 minutes to install. Screw directly into a stud for secure hold. Hang bikes by the front wheel — most hooks are rubber-coated to protect rims. For families with multiple bikes, a row of hooks keeps everything tidy and accessible. Add a small shelf below each hook for helmets and gloves. This completely eliminates the floor clutter that bikes create.
4. Build a Simple DIY Lumber Storage Rack
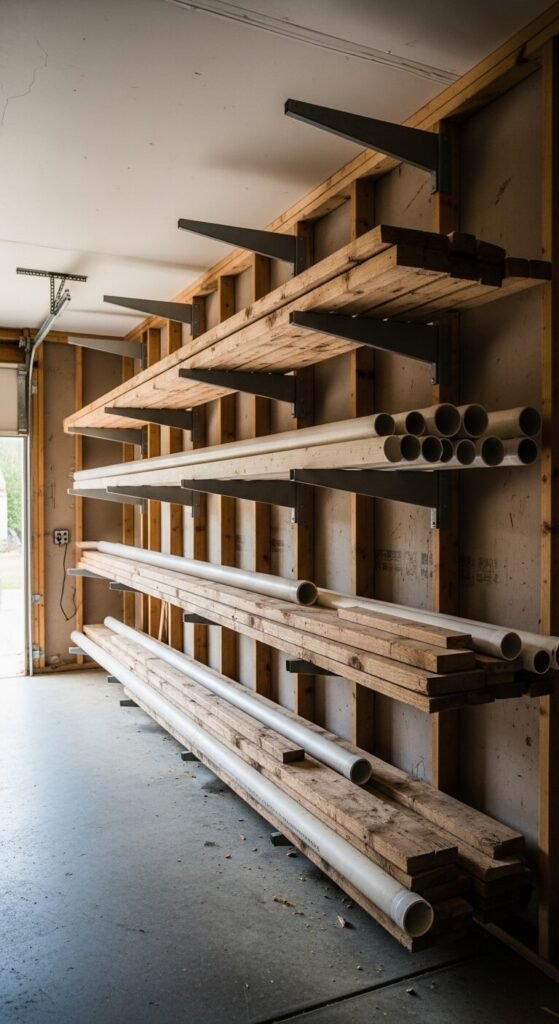
Long boards, pipes, and trim pieces are impossible to store neatly without a plan. A DIY lumber rack takes about an hour and costs under $20 in materials. Cut 2×4 arms and bolt them horizontally into studs at varying heights. Space them 16 inches apart vertically. Slide boards in horizontally. Keep heavy material on lower arms. This keeps long items off the floor and prevents warping. It’s a weekend project that pays off every time you need to grab a single board quickly.
5. Add a Freestanding Metal Shelving Unit
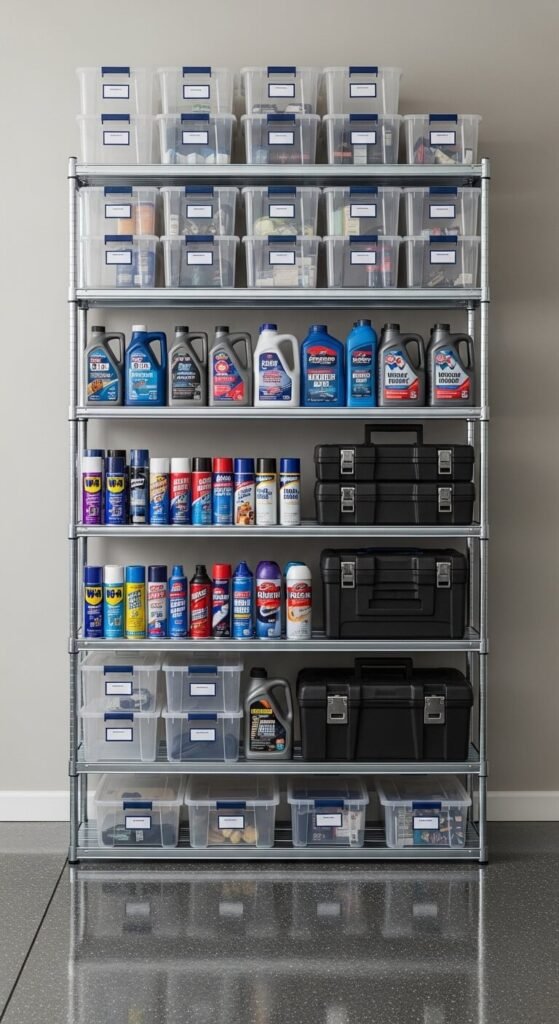
A heavy-duty metal shelving unit is the workhorse of garage storage. Units with 5–6 shelves and 2,000 lb total capacity run $80–$150 at warehouse stores. Assembly is tool-free in most cases. Adjust shelf heights to fit taller items. Use the top shelf for rarely accessed bins and lower shelves for everyday items. Wire shelving allows dust to fall through, keeping things cleaner. Anchor the unit to the wall for safety, especially if you have children around.
6. Hang a Slat Wall Panel System
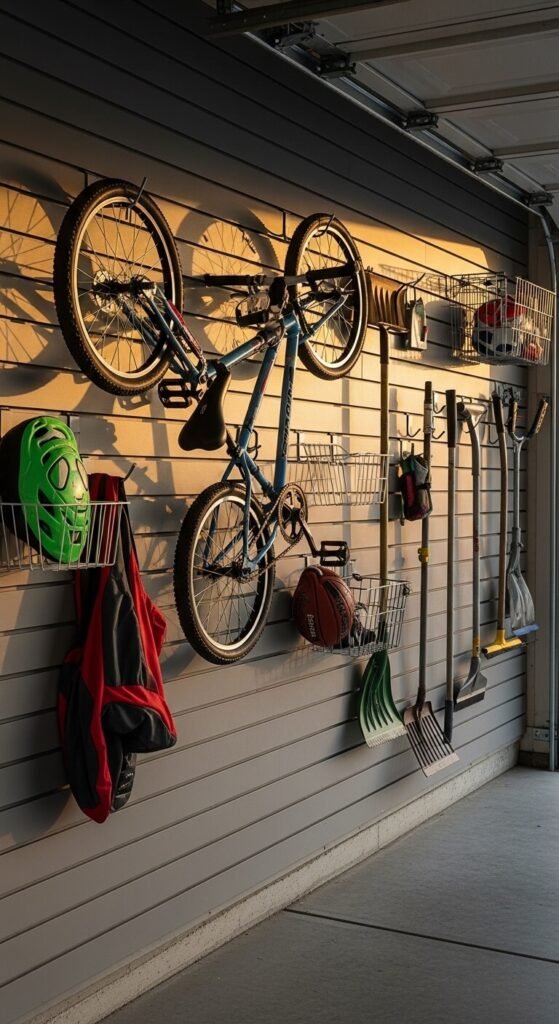
Slat wall panels are like pegboard’s more polished cousin. They cost more — around $30–50 per panel — but hold more weight and look cleaner. The horizontal channels accept a wide range of compatible hooks, baskets, and shelves. One wall can hold bikes, garden tools, sports gear, and more. No stud-finding required since panels distribute weight evenly. Great if you want a showroom-style garage. Install across one full wall for maximum impact.
7. Use Clear Stackable Bins with Labels
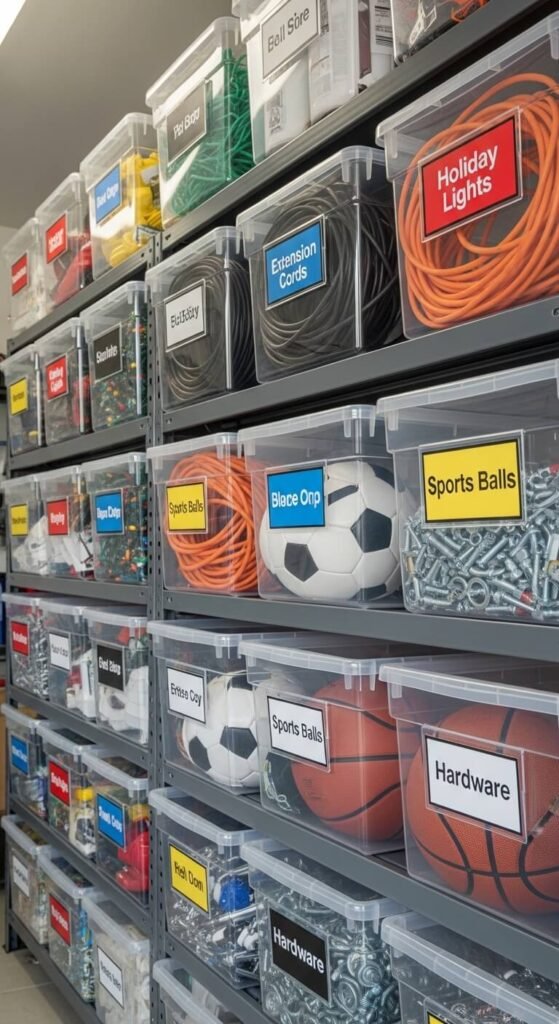
Clear bins are simple and transformative. When you can see what’s inside, you stop buying duplicates and wasting time searching. Buy matching sizes so they stack perfectly. Label every bin on the side facing out — not the top. A label maker costs $20 and pays for itself immediately. Dedicate bins by category: holiday, camping, automotive, sports. Stack heaviest bins on the bottom. This system works for any shelf and costs under $5 per bin at most big box stores.
8. Install a Folding Workbench
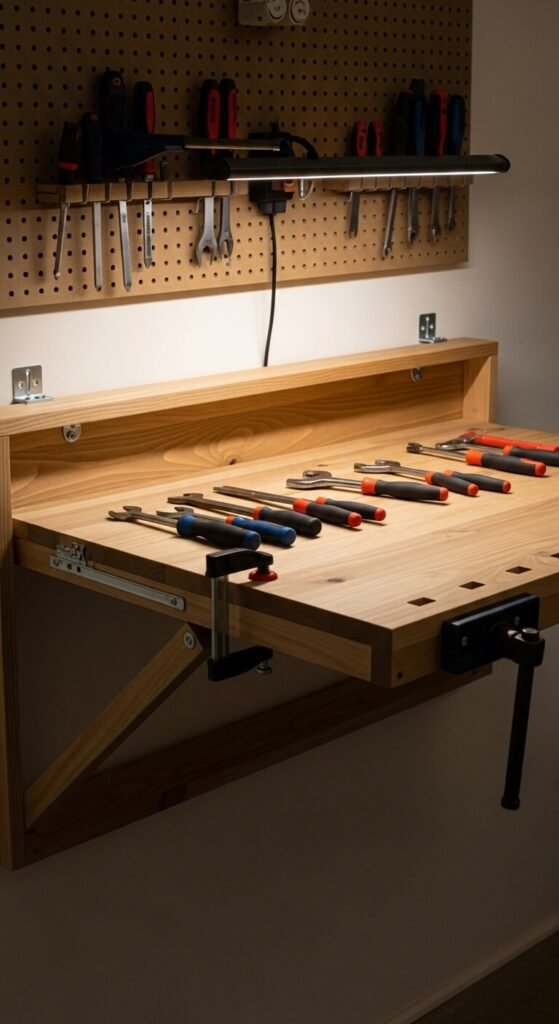
A folding workbench gives you workspace without permanently stealing floor room. When folded up, it sits flat against the wall. Drop it down for projects. Wall-mounted kits cost $50–$100 or you can build one from a solid-core door slab and piano hinge for less. Add a lip to prevent tools from rolling off. Mount a power strip above it for easy access. Ideal for smaller garages where a full-time bench would block the car.
9. Hang Garden Tools on a Rail System
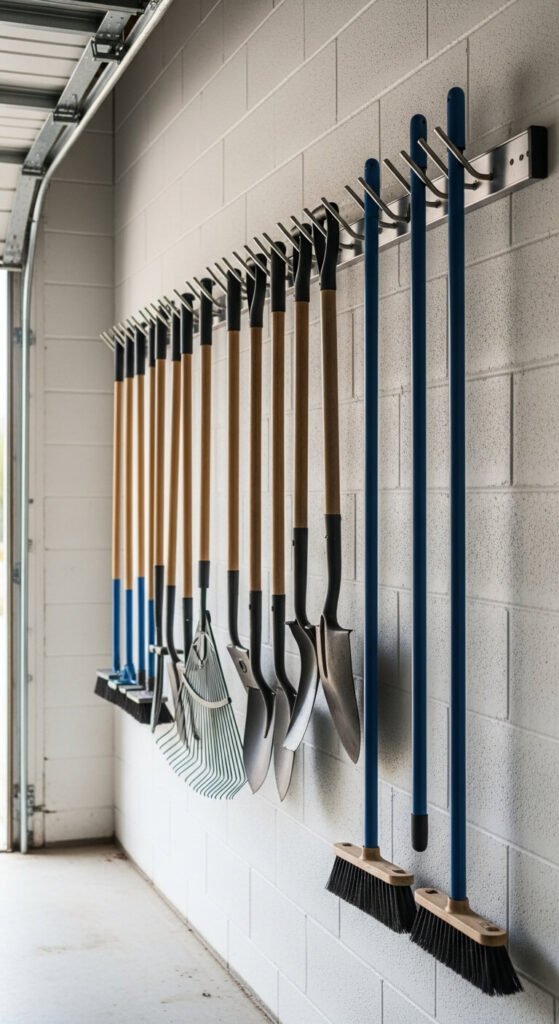
Rakes, shovels, and brooms create instant chaos when they lean in a corner. A wall-mounted garden tool rail with rubberized hooks solves this for around $25–40. Mount at shoulder height. Each tool hangs vertically, taking up almost no horizontal space. Some systems clamp tools automatically — no hooks to attach individually. This keeps handles off the floor, where they become tripping hazards. Add a small shelf below the rail for pots, gloves, or fertilizer bags.
10. Create a Sports Equipment Zone with a Mesh Ball Rack
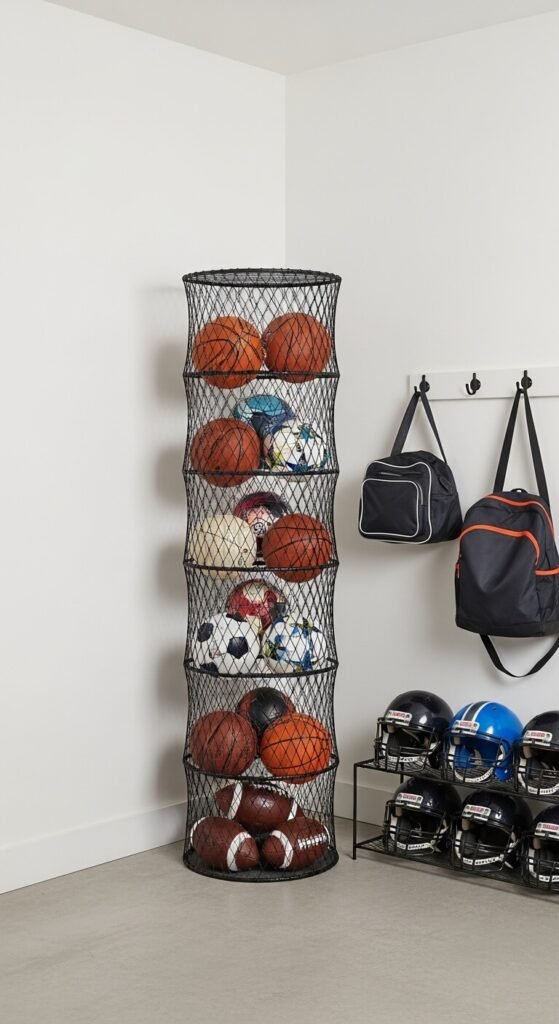
Sports balls roll everywhere and take up more room than they should. A mesh vertical ball rack corrals them into one spot for $30–60. Set it in a corner. It holds 6–12 balls depending on size. Wall hooks beside it hold bags, helmets, and pads. Use a low open shelf or cubby for shoes. Dedicate this entire corner to sports — family members will actually use it if it’s easy. Label each zone so gear gets returned to the right spot.
11. Add Magnetic Tool Strips Inside Cabinet Doors
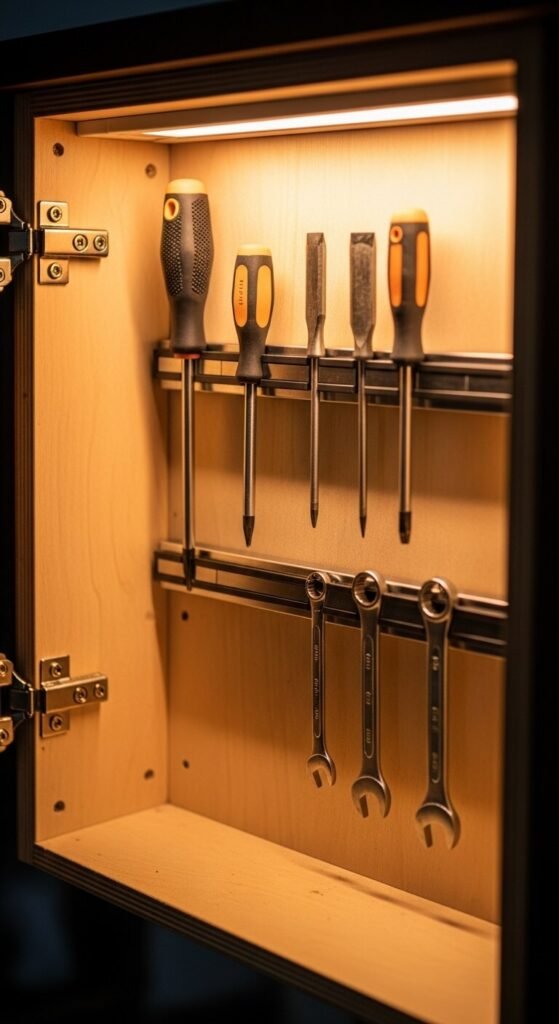
Magnetic strips are usually used in kitchens, but they’re excellent in garages too. Mount them inside cabinet doors to hold small metal tools — screwdrivers, chisels, pliers, drill bits. This uses dead space that would otherwise sit empty. A 24-inch magnetic strip costs under $15. Use two screws to mount it securely. Inside the door, tools stay protected from dust while remaining completely accessible. It’s a subtle upgrade with a big daily convenience payoff.
12. Use a Repurposed Pallet as a Wall Organizer
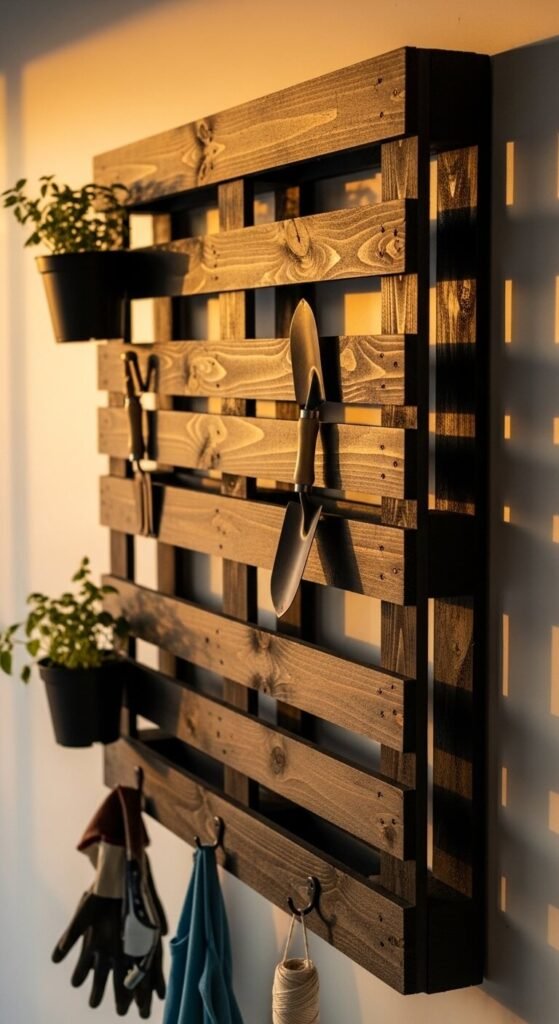
A free or cheap wooden pallet becomes a functional wall organizer with very little effort. Sand it lightly. Mount it flat against the wall with heavy-duty screws into studs. The horizontal slats naturally create shelves and hooks. Slide tools between slats. Add small S-hooks for hanging items. Screw in cup hooks for cords. Paint it to match your garage color scheme. It’s genuinely free if you pick one up from a local retailer or lumber yard. A weekend upcycle with real utility.
13. Install Pull-Down Attic Stairs for Storage Access
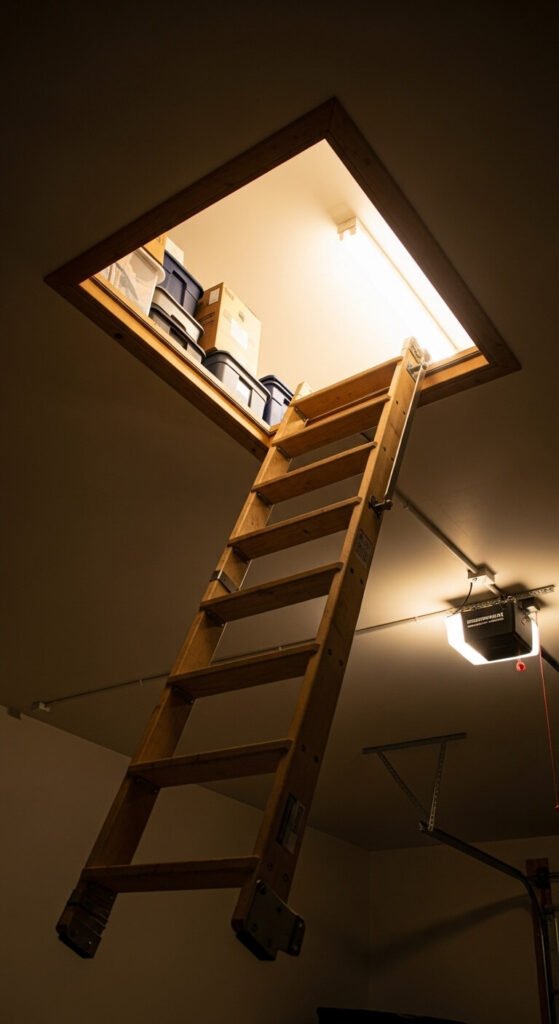
If your garage has attic space, a pull-down stair kit is a game-changer. Kits cost $150–300 and can be installed in a few hours with basic framing skills. The attic becomes a proper storage floor for seasonal bins, holiday decorations, and long-term items. Add plywood sheeting to create a solid floor up there. Label everything stored above since retrieval is less frequent. This doubles your usable square footage without touching the walls or floor below.
14. Hang a Wire Grid Panel for Flexible Storage
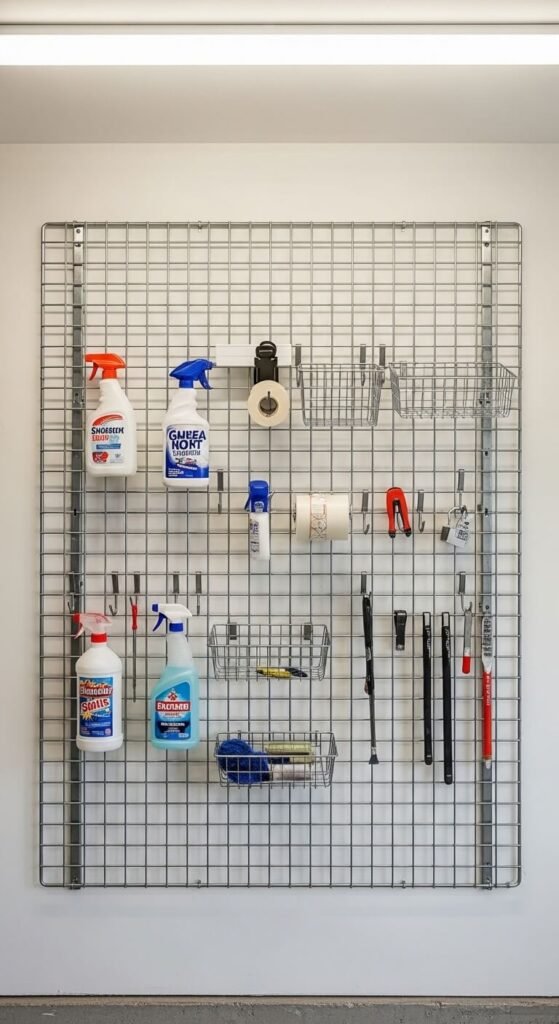
Wire grid panels — often sold as retail display fixtures — are cheap, flexible, and strong. A 2×4-foot panel costs $20–30. Mount to studs. Then use S-hooks, wire bins, and small shelves that clip directly onto the grid. Rearrange whenever your storage needs change. These work well for cleaning supplies, small tools, spray bottles, and rolled items. Unlike pegboard, there’s no hole-drilling required for hooks. Great for renters or anyone who wants a less permanent solution.
15. Build Corner Shelving to Use Dead Space
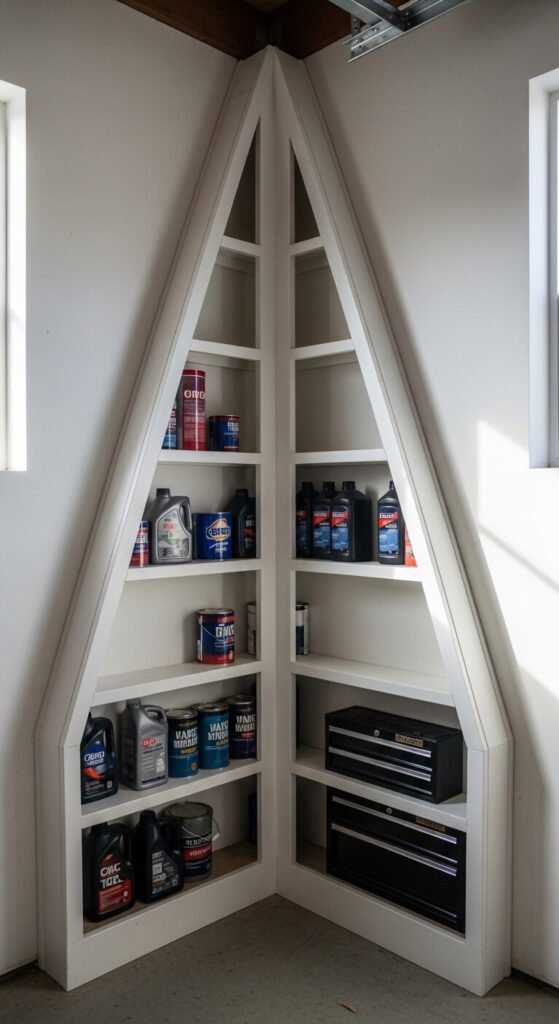
Garage corners are almost always wasted. A simple corner shelf unit fills that triangle of space and adds meaningful storage. Build it from plywood and 2×4 supports. Paint it to match the walls. Three or four shelves from floor to ceiling create real capacity — enough for paint cans, automotive supplies, and spare parts. The build takes a half-day and materials cost under $50. If carpentry isn’t your thing, L-shaped corner shelves sold at hardware stores achieve a similar result.
16. Mount a Hose Reel to the Wall
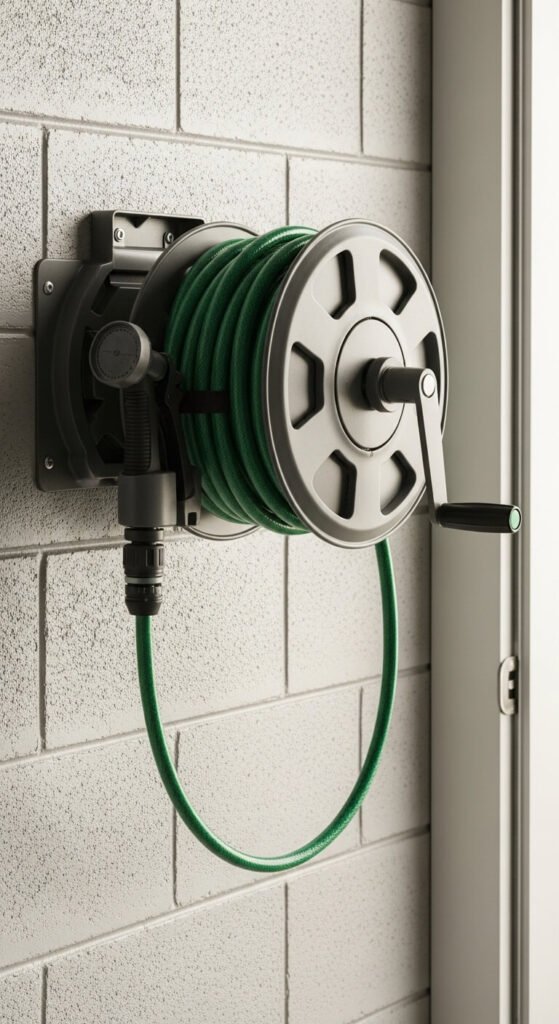
A garden hose left on the floor tangles, kinks, and takes up significant space. A wall-mounted hose reel keeps it coiled, protected, and off the ground permanently. Basic mounted reels start at $25. Retractable wall reels cost $60–100 and make rewinding effortless. Mount near the water source to keep hose length manageable. Include a small hook beside the reel for the spray nozzle. It’s a quick install — usually just four screws — and immediately declutters a major floor hazard.
17. Use a Rolling Tool Cart for Portable Access
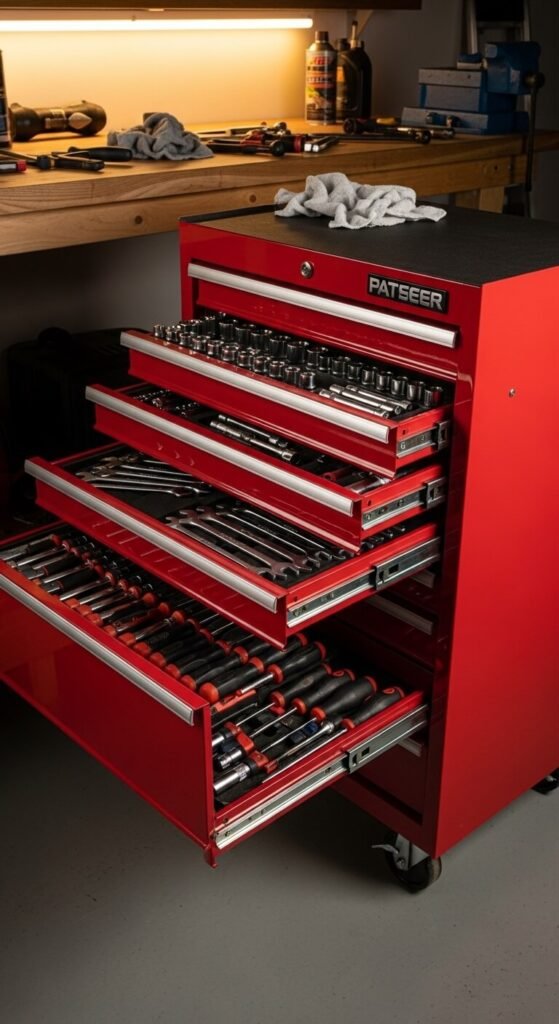
A rolling tool cart doesn’t just store tools — it keeps your workflow mobile. Pull it to wherever you’re working. Entry-level 5-drawer carts run $80–150 and hold a full set of hand tools with room to spare. Use drawer liners to keep tools from sliding. Label each drawer by category: sockets, wrenches, screwdrivers, measuring tools. A cart with a solid top lid also doubles as a small work surface. Roll it against the wall when done so it doesn’t occupy center floor space.
18. Install Wall-Mounted J-Hooks for Ladders
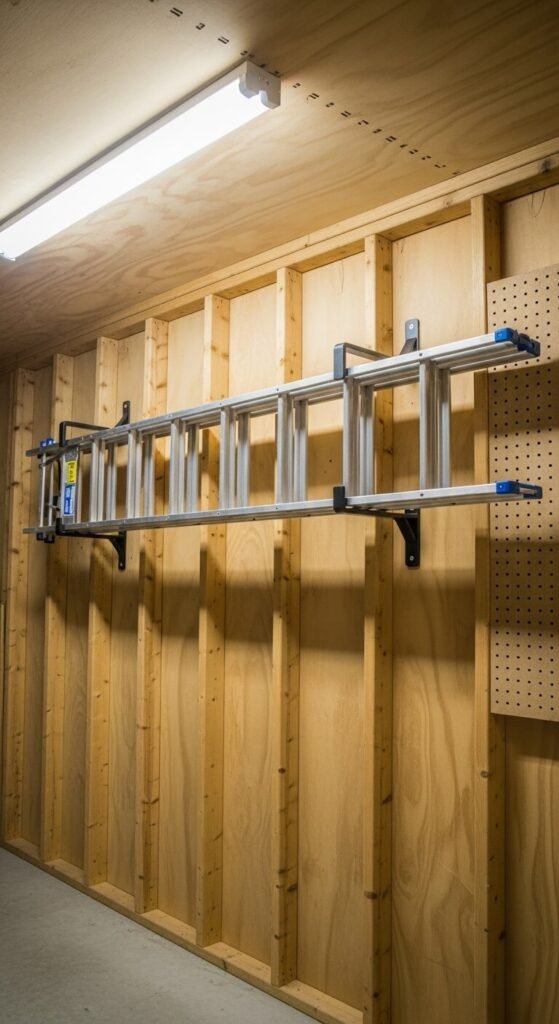
Ladders lean against walls and tip over — or they block shelves and paths. Heavy-duty J-hooks mount to studs and store your ladder horizontally and safely, about 5 feet off the floor. Two hooks per ladder is all you need. Rated hooks hold 100+ lbs each. This completely removes the ladder from your usable floor space. The same hook system works for canoe paddles, long lumber, and ski poles. A pair of hooks costs under $15 total and installs in 10 minutes.
19. Add a Magnetic Parts Tray Station

Tiny parts — screws, nuts, washers, cotter pins — disappear constantly. A set of magnetic parts trays keeps them organized on the workbench or mounted to a magnetic strip on the wall. Trays cost $5–15 for a set of six. Use one per size or type of fastener. Mount a metal strip at eye level near the bench so trays stick vertically when not in use. When working, pull the tray, set it on the bench, and everything stays put. Simple, cheap, effective.
20. Create a Charging Station for Power Tools
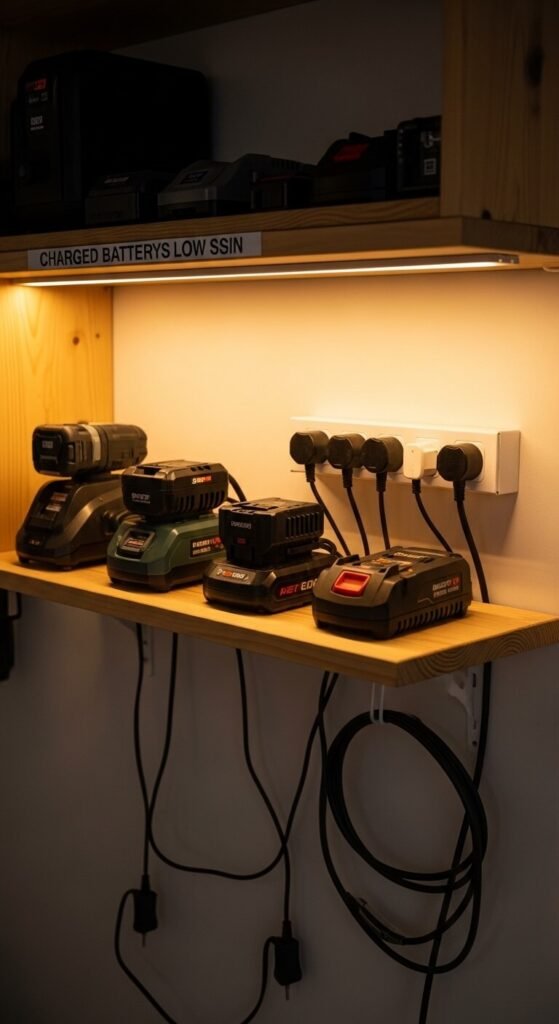
Power tool batteries left scattered across the workbench drain faster and get damaged. A dedicated charging station shelf keeps chargers plugged in, batteries topped up, and everything in one spot. Build a simple plywood shelf, mount it at eye level, and add a power strip below it. Chargers plug into the strip. Charged batteries sit on the shelf. Label each charger position. This takes about an hour to build and costs $20–30. No more hunting for a charger before starting a project.
21. Use Cabinet Doors for Hidden Clutter Storage
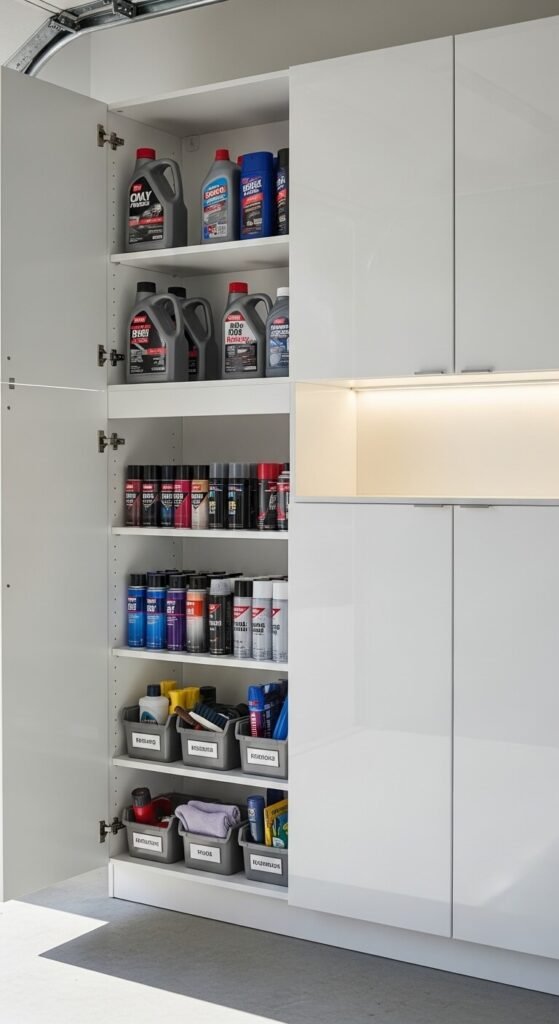
Exposed shelving looks organized until it doesn’t. Wall-mounted cabinets with doors hide the clutter behind a clean front, making the whole garage feel tidier. Ready-to-assemble garage cabinets start around $80–150 per unit. Mount a row of uppers on one wall for chemicals, paints, and supplies you don’t want kids accessing. Add child safety locks. Inside, use bins and shelf risers to maximize the cabinet’s interior. Closed storage makes the entire garage look more intentional.
22. Hang a Tool Bag Rail System Near the Entry
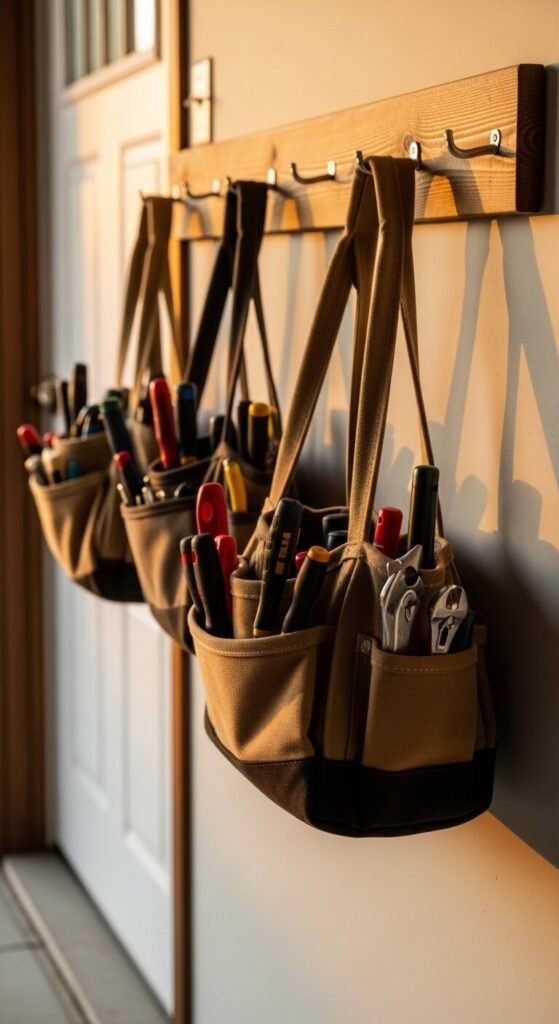
Keep frequently used tools near the garage door entry where you actually grab them. A simple wooden rail — even a thick dowel mounted on two brackets — lets you hang tool bags, tote bags, and kits by their handles. Mount it at chest height. Grab what you need without digging through cabinets. This is a two-hour DIY project using a $5 dowel and $10 in hardware. Use one bag per task category: plumbing, electrical, painting, general repair.
23. Store Seasonal Items in Labeled Vacuum Bags

Bulky seasonal items like winter coats, sleeping bags, and blankets consume enormous bin space. Vacuum compression bags shrink them down to a fraction of their size. A pack of 6 bags costs $15–25. Stuff them, zip them, and use a vacuum to compress. Store flat on a shelf or slide under a workbench. Label each bag with a strip of masking tape and a marker. They protect from moisture and pests too. When the season changes, swap the bags out. Excellent use of shelf space.
24. Build a PVC Pipe Tool Organizer

PVC pipe is cheap, easy to cut, and completely customizable. Buy a 10-foot length of 2–3 inch diameter PVC for under $10. Cut sections into varying lengths. Mount them upright or at an angle on a plywood backer board. Each section holds one tool upright by the handle — perfect for screwdrivers, chisels, paintbrushes, and files. This is a beginner-level DIY project. No special tools beyond a hacksaw. The whole organizer costs under $20 to build.
25. Add Under-Shelf Hanging Bins
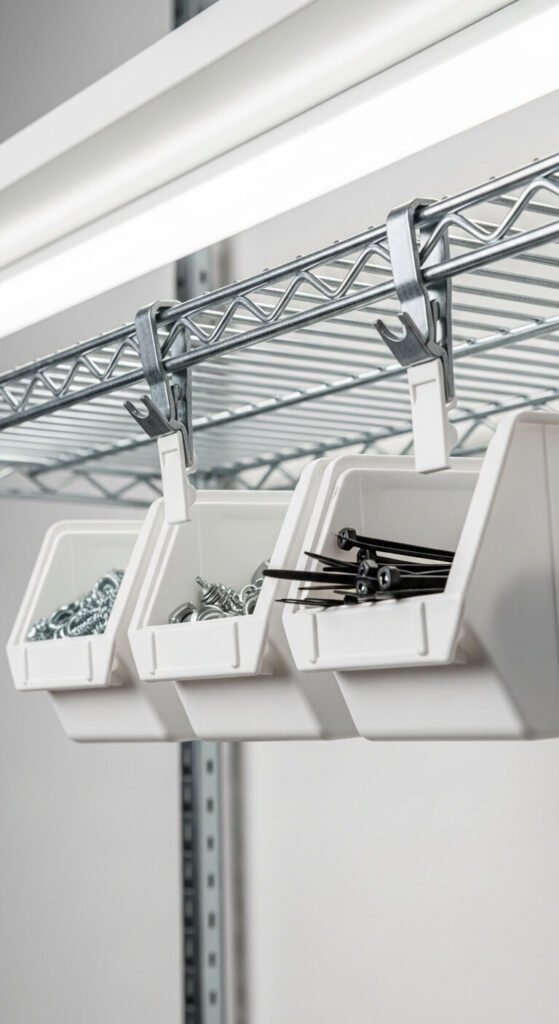
The space directly under a shelf is almost always unused. Clip-on under-shelf bins attach to wire shelving with no tools and hang down, creating an extra row of storage without taking up shelf surface. Packs of 4–6 bins cost $15–25. Use them for small hardware, rubber bands, batteries, tape rolls, and zip ties. They work on any wire shelving and take 30 seconds to install. A small but smart upgrade that multiplies the usable storage on every shelf.
26. Create a Dedicated Car Care Station
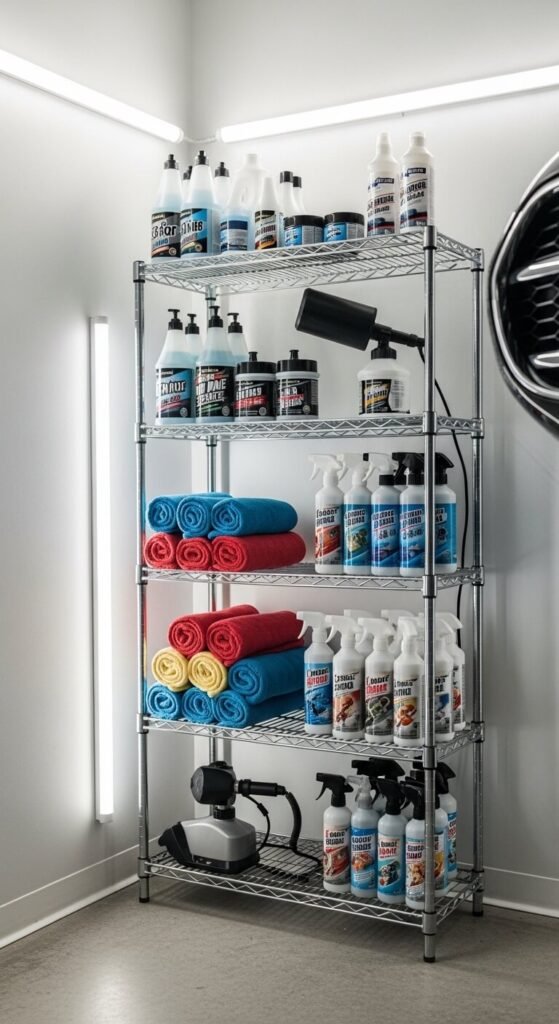
Keeping car care products scattered across shelves means you never have what you need when you wash the car. Group everything in one dedicated zone. Assign one shelving unit or cabinet section to car care only: washes, waxes, microfiber towels, tire cleaners, and applicators. Roll towels to save shelf space. A small labeled bin for each product category prevents the jumble. Mount a hook nearby for the foam cannon or wash mitt. This zone makes detailing faster and more consistent.
27. Label Everything — Including Zones
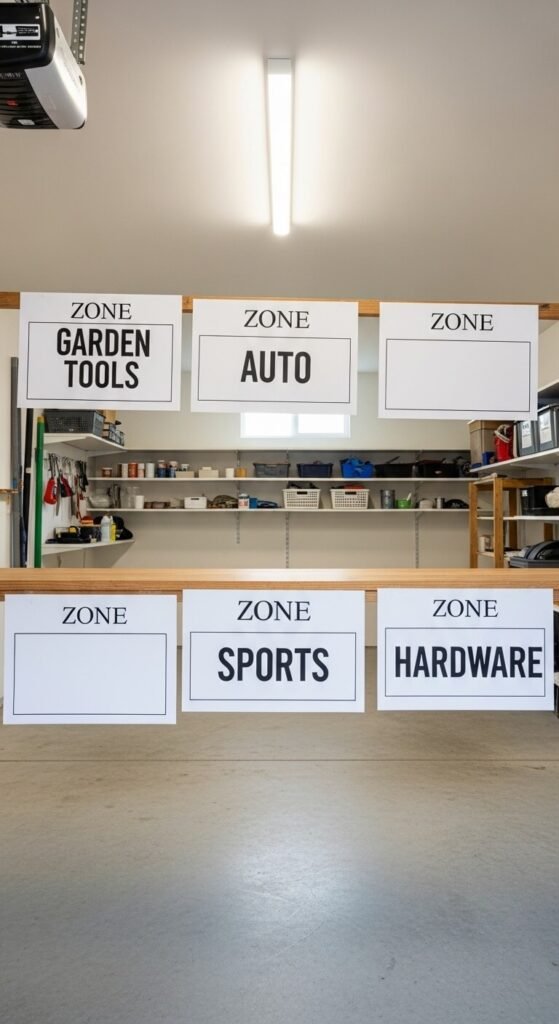
A garage can be perfectly organized and still feel chaotic if nothing is labeled. Zone labels mounted at eye height train every household member where things belong — and where to return them. Print labels on a home printer, laminate them, and mount with Command strips. Label shelf edges, bin fronts, and wall zones. Use large, readable font. A label maker speeds this up but isn’t required. This step takes one afternoon and costs almost nothing. It’s also the reason your organization system actually holds up over weeks and months.
Conclusion
A well-organized garage doesn’t happen overnight, but it doesn’t require a massive budget either. Start with one or two solutions from this list — the ones that address your biggest daily frustrations first. Maybe that’s bikes on the floor, tools that disappear, or bins stacked in unstable towers. Fix those first. Then layer in additional solutions over time. The best garage storage system is the one you actually maintain. Every item on this list is practical, affordable, and proven. Pick one this weekend and get started.